4. 概念和基本程序
目前,用于理解libdc1394的可用文档非常少。在可用的文档中,有一个FAQ,它只讨论了摄像头的一般概念,以及一些人们发布查询的论坛。
我们不得不阅读libdc1394源代码,以了解如何从摄像头抓取帧。对这个主题的完整解释的极端需求促使我们编写了这篇HOWTO。
根据我们通过探索摄像头源代码所理解的内容,我们正在展示我们对该库的见解。
我们鼓励您在阅读下一节时继续参考以下文件
dc1394_control.h
dc1394_control.c
dc1394_capture.c
dc1394_format7.c
该dc1394_control.h文件是最重要的,因为它包含各种函数和数据结构的声明。应该阅读它以了解IEEE1394摄像头支持的功能以及访问和控制摄像头各种功能的函数。
dc1394库与raw1394密切合作,因为所有函数都使用raw1394的函数 (raw1394_read() 和 raw1394_write()) 来检索或修改摄像头的各种参数值。 这也是安装libdc1394之前必须安装raw1394的原因之一。
要了解库提供的函数如何工作,我们需要了解IEEE1394摄像头的一些技术方面
任何时候都可以有多个摄像头连接到主机卡,因此需要唯一标识摄像头节点。
摄像头有一些控制寄存器来设置摄像头的功能。
根据IEEE规范,摄像头可以以不同的格式抓取图像。图像格式由两个参数定义:格式和模式。定义了五种模式
Format_0 包含低分辨率模式,最高可达640x480
Format_1 包含中等分辨率模式:800x600 和 1024x768
Format_2 包含百万像素模式:1280x960 和 1600x1200
Format_7 是可扩展的图像格式。使用它,您可以更改图像大小、颜色编码和其他参数
为了设置或获取摄像头参数/功能的值,库函数将修改或读取寄存器值。
摄像头可以在有或没有DMA的情况下工作。我们非常感谢Ian Peikon和Tim Hanson贡献了一个关于使用DMA支持的IEEE1394摄像头的部分
有了上面的背景,我们开始讨论各种函数、数据结构和可用的其他杂项功能,这些功能都在dc1394_control.h文件中。
我们想提一下dc1394_control.h文件的一个重要方面,它列出了可以为数据速度、帧速率、摄像头模式和图像格式设置的值。所有值都以枚举的形式出现,以帮助您编写可读的代码。例如,速度枚举表明数据速度只能设置为 100、200、400、800、1600 或 3200。
该dc1394_control.h还列出了您的摄像头支持的功能(亮度、色调、清晰度、饱和度等)。
4.1. 重要的数据结构
该库提供了一些结构,这些结构可用于存储摄像头和图像相关的信息。它们已经在dc1394_control.h文件中。
结构 | 用途 |
dc1394_camerainfo | 有助于访问有关摄像头型号、供应商、ccr_offset(用于访问寄存器)的信息。 |
dc1394_cameracapture | 包含摄像头设置时要操作的各种参数。它还声明了一个int类型的缓冲区,该缓冲区将用于存储抓取的帧。 |
dc1394_misc_info | 包含有关ISO通道ID、iso通道速度、存储器通道号的信息。 |
dc1394_feature_info | 包含有关特定功能(亮度、色调、伽玛、白平衡等)的信息,例如,该功能的可用性和值。 |
我们将主要关注dc1394_cameracapture结构。
4.2. 函数类型
我们将库提供的函数分为6种类型。(此分类纯粹是为了方便讨论而由我们自己完成的)。这些函数中的每一个都在dc1394_control.h中声明。我们建议您在阅读后续部分时手头保留该文件副本。
Get/Query函数
Set函数
Print函数
Setup函数
Format7函数
Release函数
4.2.1. Get/Query函数
这些函数用于获取摄像头各种功能的值、有关ISO通道、触发模式、帧速率、格式和模式的信息。函数包含get或query在他们的名字里。
例如,
int dc1394_get_gamma (raw1394handle_t handle, node_t node, unsigned int *gamma) |
大多数get函数至少需要三个参数
两者raw1394handle_t和node_t节点:这两者共同识别摄像头
指向获取值的指针,例如,int * gamma
如果我们尝试追踪函数调用的流程,我们可以了解实际发生的事情
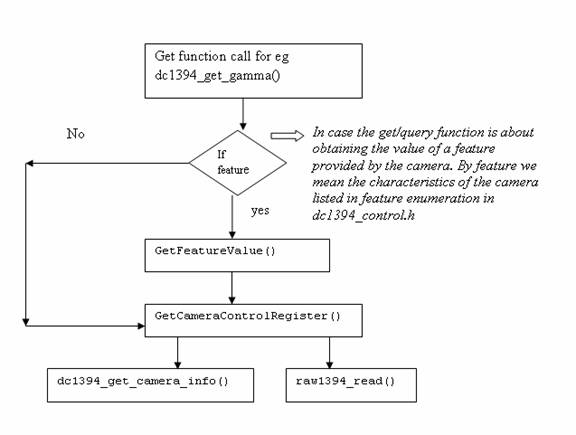
如果get函数旨在检索摄像头功能的值(功能枚举中列出的参数的值),那么get函数将调用另一个get函数 (GetFeatureValue),该函数将功能的枚举值作为输入。例如,在伽玛值的情况下,该函数传递422作为值(该值可以从dc1394_control.h文件中给出的枚举计算得出)。
最终,调用GetCameraControlRegister函数,其任务是从适当的控制寄存器获取值。该函数以偏移值 (octlet_t offset) 作为从基址寄存器的偏移量作为其调用的输入。函数原型在dc1394_internal.h.
GetCameraControlRegister (raw1394handle_t handle, nodeid_t node,
                         octlet_t offset, quadlet_t *value)
|
上述操作会将最终结果存储在value.
 | 数据类型注释 |
|---|---|
该库经常使用typedef数据类型octlet_t和quadlet_t。这些在dc1394_internal.h中定义,分别代表 8 字节和 4 字节数据类型。 |
该GetCameraControlRegister函数又将调用dc1394_get_camera_info()以获取基址寄存器的地址
camera->ccr_base = CONFIG_ROM_BASE + info->ccr_offset; |
一旦知道基址寄存器和偏移量,raw1394_read()由GetCameraControlRegister调用以读取实际值。
现在get函数 (dc1394_get_gamma) 使用GetCameraControlRegister返回的值来修改参数伽玛。
int dc1394_get_gamma (raw1394handle_t handle, node_t node , unsigned int *gamma ) |
通过这种方式,用户获得了他查询的摄像头参数的值。
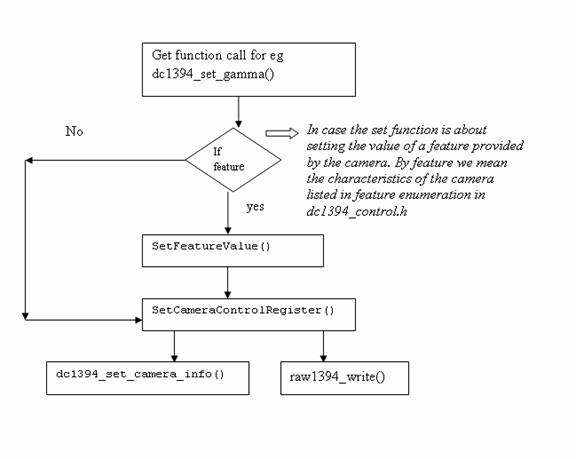
4.2.2. Set函数
这些函数用于设置各种摄像头功能的值。几乎每个 get 函数都有一个对应的 set 函数。您可以通过搜索set字符串来识别这些函数。
例如,
dc1394_set_gamma (raw1394handle_t handle, nodeid_t node, int gamma) |
与get函数一样,此函数需要raw1394handle_t和nodeid_t用于摄像头识别。
另一个参数,gamma是用户指定的伽玛参数值。
函数调用的流程对于理解实际发生的事情非常有帮助。该流程与get函数完全相同。唯一的区别是这次所有中间函数也是set函数,而不是raw1394_read(),它使用raw1394_write()将摄像头参数的值写入寄存器。
4.2.3. Print函数
有三个可用的打印函数
dc1394_print_camera_info:此函数用于打印存储在 dc1394camera_info 结构中的值。通常在dc1394_get_camera_info()之后调用打印函数,以确保 dc1394camera_info 结构不为 NULL。
dc1394_print_feature:此函数用于打印任何功能的值。它将指向 dc1394_feature_info 结构的指针作为输入。
dc1394_print_feature_set:此函数用于打印摄像头中存在的所有功能的值。它将指向 dc1394_feature_set 结构的指针作为输入。函数调用基本上在 for 循环中重复调用 dc1394_print_feature。
4.2.4. Setup函数
顾名思义,这些函数用于准备摄像头以开始抓取图像。为了设置摄像头,必须将一些参数传递给函数。参数的数量和类型特定于设置函数,但基本上所有设置函数中都必须传递三个参数raw1394handle_t, nodeid_t以及指向 dc1394_cameracapture 结构的指针(这是为了提供抓取图像的缓冲区并保留属性,如帧的高度和宽度)。
如前所述,raw1394handle_t和nodeid_t唯一地定义摄像头,而指向 dc1394_cameracapture 的指针为要抓取的图像帧提供缓冲区。它还存储有关帧宽度和高度的信息,这在图像处理时很有用。
传递的其他参数包括数据速度、帧速率、图像格式、图像模式和 ISO 通道号。
如果摄像头使用DMA,则DMA缓冲区和丢帧的数量需要提供。在大多数应用程序中,您可能希望将 DMA 缓冲区的数量设置得相对较低(即 1),这可确保您以接近实时的状态查看帧。丢帧对于实时也很重要,因为它会导致捕获函数丢弃 DMA 环形缓冲区中缓冲的帧,除了最后一个。我们将在本 HOWTO 的后面部分讨论 DMA 函数
各种设置函数是
dc1394_dma_setup_capture
dc1394_setup_capture
dc1394_setup_format7_capture
dc1394_dma_setup_format7_capture
这些设置函数已经在dc1394_capture.c.
中定义。您可以选择传递参数值的方式,例如数据速度、格式、模式和通道。您可以指示函数从摄像头获取值,而不是自己提供值。这可以通过传递QUERY_FROM_CAMERA来代替该函数参数的实际值。
基本的控制流程很容易理解
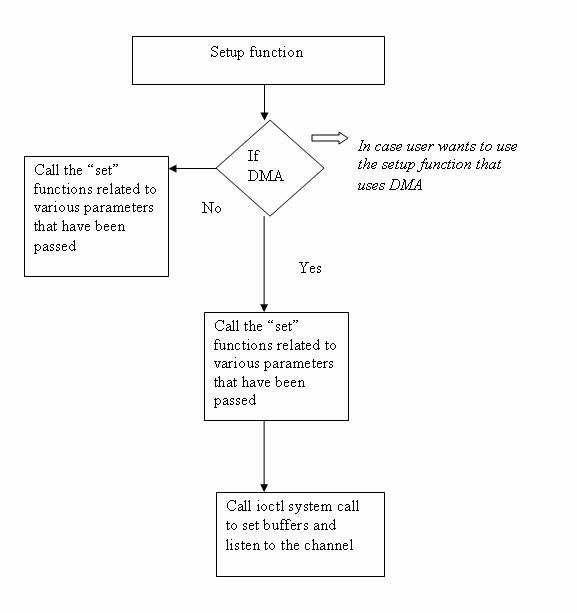
如图3所示,设置函数又调用各种 set 函数来将参数值设置为摄像头寄存器。在 DMA 设置的情况下,在调用 set 函数后,将调用 ioctl 系统调用来为 DMA 缓冲区分配内存并返回一个指针capture_buffer在用户空间中。
如果 DMA 设置不正确,ioctl 系统调用将失败
设置函数还会为摄像头捕获缓冲区分配内存
camera->capture_buffer=(int*)malloc(camera->quadlets_per_frame*4); |
4.2.5. Format7函数
这些函数仅在相机设置为 Format7 时使用。这种格式是首选的,因为它允许用户根据需要定义要捕获的图像大小。默认大小为 1024x768;您可以将其设置为不同的尺寸,例如 960x720。
所有 Format7 函数都具有format7在其函数名称中,并且这些函数已在单独的文件中定义,dc1394_format7.c.
Format7 的设置函数与普通设置函数略有不同,因为它还需要帧的大小,而您不必传递格式参数作为设置函数,因为它仅适用于特定格式,例如 Format7。函数调用流程与上一节中讨论的相同。
Format7get函数被称为查询函数。该机制与普通的 get/query 函数不同:它们不调用GetCameraControlRegister; 而是调用GetCameraFormat7Register().
以下流程图将使差异显而易见
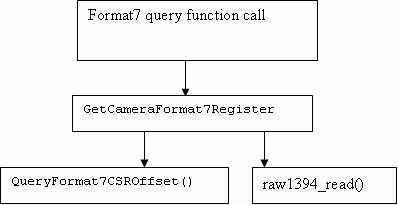
Format7 查询函数将调用GetCameraFormat7Register,它应该从相机的控制和状态寄存器中读取值。反过来,此函数将调用QueryFormat和CSROffset以了解已查询的特定信息的偏移量。获取偏移量后,raw1394_read用于实际读取值。
Format7 设置函数也遵循相同的逻辑,明显的区别是读取函数被写入函数替换,例如,SetCameraFormat7Register和raw1394_write().
4.3. Coriander:libdc1394 库的 GUI
Coriander 有助于轻松处理 IEEE1394 相机。它使用上面讨论的函数和库,并为它们提供 GUI。Coriander 的主要优点是它可以节省通常在相机设置中浪费的时间。此外,Coriander 仅显示相机上存在的功能和属性,因此您可以判断相机对于您的应用程序开发有多大用处。Coriander 最重要的功能是它能够实时显示捕获的图像。
Coriander 还允许用户将 BGGR 图像转换为 RGB。我们将在后面的章节中详细讨论这些类型图像的含义。一些有助于理解 Coriander 功能的文件是
thread_iso.c
Camera.c
main.c
Coriander 主页包含一个优秀的用户手册,如果遇到任何困难,可以使用它:http://damien.douxchamps.net/ieee1394/coriander/manual.php。
我们对 Coriander 的使用仅限于检查相机是否正常工作并确认焦点是否正确。我们将在后面的章节中提供有关 Coriander 的更多使用信息。
4.4. 示例:如何从 IEEE1394 相机抓取图像
在本节中,我们将演示如何编写一个小程序来从相机抓取图像。我们采用了程序 (grab_gray_image.c) 在库 tar 文件中的示例中给出。我们删除了一些行以提高代码的可读性。我们在下面提供了此代码的说明。为了让您清楚地了解代码的哪个部分做什么,我们将代码行按以下任务分组在一起。
#include <stdio.h> #include <libraw1394/raw1394.h> #include <libdc1394/dc1394_control.h> #include <stdlib.h> |

- 包含头文件,这意味着包含
libraw1394/raw1394.h
libdc1394/dc1394_control.h
这些是访问库函数所必需的。

- 声明以下数据类型的三个变量
dc1394_cameracapture
raw1394handle_t
nodeid_t *
该raw1394handle_t和nodeid_t *需要唯一地标识相机。而且,raw1394handle_t用于保存为 OHCI 兼容主机卡创建的句柄。

- 打开 ohci 并为其分配一个句柄。
这可以通过
handle=dc1394_create_handle(0)
完成,其中handle是 raw1394handle_t 类型。参数0指的是相机在主机卡上的位置(主机卡上可能有多个插槽;0 表示相机位于第一个插槽上)。
如果传递的数字错误,则不会创建句柄。

- 获取相机节点
可以有多个相机节点,因为 IEEE1394 支持单个端口上的多个设备。但对于我们的讨论,我们将假设只有一个相机存在。以下是如何获取节点
int numNodes = raw1394_get_nodecount(raw1394handle_t handle)
camera_nodes=dc1394_getcamera_nodes(handle,&numCameras,1)
如果返回的相机数量是numCameras <1,这意味着未检测到相机。
1函数中的 表示将在控制台上显示找到的相机节点的打印描述。

- 检查camera_nodes[0]==numNodes -1的条件。它必须为假。对此的解释超出了本文档的范围。

- 调用设置函数并传递各种参数。例如,让我们检查一下上面示例的设置函数
我们的建议是,应首先从相机查询各种参数,然后再传递。这有助于成功设置,因为通常用户不知道必须在设置函数调用中传递的各种参数的实际值,最终传递了错误的值。在这种情况下,设置未正确完成,并且相机未初始化。
我们列出了合适的get应首先调用的函数,以便获得设置参数的正确值
dc1394_get_iso_channel_and_speed(handle,camera_nodes[0], &channel,&speed);/* 获取通道和数据速度 */
dc1394_get_video_format(handle,camera_nodes[0],&format);/* 获取格式 */
dc1394_get_video_framerate(handle,camera_nodes[0],&framerate);/* 获取帧速率 */
dc1394_get_video_mode(handle,camera_nodes[0],&mode);/* 获取模式 */
所以上面的dc1394_setup_capture函数调用将如下所示

- 设置触发模式。这通常不是必需的。这就像亮度
dc1394_set_trigger_mode(handle,camera.node,TRIGGER_MODE_0)将触发模式设置为 0。

- 让相机开始将数据发送给用户。这是通过启动 ISO 传输来完成的。使用以下函数
dc1394_start_iso_transmission(handle,camera.node)

- 通过调用函数捕获一个帧
dc1394_single_capture(handle,&camera)
完成,其中camera是指向结构 dc1394_cameracapture 的指针。此函数将抓取图像并将其存储在结构提供的缓冲区 (capture_buffer) 中。
为了捕获多个帧,请使用 for 循环并将函数放在其中

- 抓取图像后,通过调用以下函数停止数据传输
dc1394_stop_iso_transmission(handle,camera.node)
- (11)
- 将 PGM 文件头添加到捕获的缓冲区以使用 gimp 查看图像。
- (12)
- 使用 fwrite 保存捕获的图像,方法是将缓冲区 (camera.capture_buffer) 写入文件。图像的其他参数(如高度和宽度)可以从同一结构中提取camera.frame_width, camera.frame_height.
- (13)
- 关闭相机。此步骤对于防止内存泄漏是必要的
为了编译程序,请使用:gcc -o grabImage grabImage.c -ldc1394_control -lraw1394,其中grabImage.c是您的程序。
     dc1394_setup_capture(

/* handle and camera_nodes[0] uniquely identifies the camera */
     handle,
    camera_nodes[0],
    0, /* channel */

/*format of the Image */
    FORMAT_VGA_NONCOMPRESSED, MODE_640x480_MONO, /* mode of the image */
    SPEED_400, /* data speed */
    FRAMERATE_7_5, /*Frame rate */
    &camera /*dc1394_cameracapture type pointer *./
    )!=DC1394_SUCCESS)
|
     dc1394_setup_capture(

/* handle and camera_nodes[0] uniquely identifies the camera */
     handle,
     camera_nodes[0],

   /*we pass the variables instead of actual values */
     channel ,
     format,
     mode,
     speed,
     framerate,
     &camera /*dc1394_cameracapture type pointer *./
     )!=DC1394_SUCCESS)
|
| 关于节点的说明 |
|---|---|
我们传递了camera.node这表明正在使用 dc1394_cameracapture 结构,并且仅引用已为其设置相机的特定节点,但我们也可以使用camera_nodes[0]. |
for( i=0;i<100 ;i++)/* to capture 100 images*/ dc1394_single_capture(handle,&camera) |
dc1394_release_camera(handle,&camera); dc1394_destroy_handle(handle); |
我们希望在阅读了这种算法式的解释之后,您可以轻松地理解示例代码。
如果我们使用 Format7 图像格式,我们将只需要更改setup_capture函数。让我们看一下设置函数
      dc1394_setup_format7_capture(
  /* handle and camera_nodes[0] uniquely identifies the camera */
            handle,
            camera_nodes[0],
            channel, /* channel */
            mode , /*mode */
            bytes_per_packet ,
            left ,/*area of interest start column */
            right, /*area of interest start row */
            width,/* area of interest width */
            height /* area of interest height */
           &camera /* dc1394_cameracapture type pointer *./
            )!=DC1394_SUCCESS)
|
dc1394_get_iso_channel_and_speed(handle,camera_nodes[0], &channel,&speed)/* 获取通道和数据速度 */
dc1394_get_video_mode(handle,camera_nodes[0] &mode);/* 获取模式 */
dc1394_query_format7_byte_per_packet(handle, camera_nodes[0], mode ,&bytes_per_packet);/* 获取每个数据包的字节数,这取决于模式 */
left、top 的值可以设置为QUERY_FROM_CAMERA,或者可以直接由用户指定。
宽度和高度的值取决于用户想要的帧大小,例如,如果想要 960x720,则将 960 作为宽度传递,将 720 作为高度传递。
4.5. 示例:如何使用 DMA 从 IEEE1394 相机抓取图像
本节由 Ian Peikon 贡献<idp2@duke.edu>和 Tim Hanson<tim@hardcarve.com>现在我们将展示一个如何使用 DMA 调用从相机抓取帧的示例。该示例很容易理解,因为逻辑与之前的示例相同。稍后我们将比较上一个示例(没有 dma)和这个示例(有 dma)中使用的函数调用,以便更好地理解。
#include <stdio.h>
#include <libraw1394/raw1394.h>
#include <libdc1394/dc1394_control.h>
#include <stdlib.h>
#include <iostream>
#define IMAGE_FILE_NAME "Image.pgm"
using namespace std;

int main(int arc, char *argv[]){
        FILE * imagefile;
        dc1394_cameracapture camera;
        int numNodes;
        int numCameras;
        raw1394handle_t handle;
        nodeid_t * camera_nodes;
        unsigned int channel, speed, format, framerate, mode;

        /*Step 1: Open ohci and assign a handle to it.*/
	/*=======================================================*/
	handle = dc1394_create_handle(0);
        if(handle==NULL){
                fprintf(stderr, "Unable to acquire a handle. \n\n");
        }
        else{
		 cout <<"dma1394: Handle aquired successfully-" <<handle<<"\n";
        }

/*Step 2: Get the camera nodes and describe them as we find them.*/
	/*=========================================================================*/
	numNodes = raw1394_get_nodecount(handle);
        camera_nodes = dc1394_get_camera_nodes(handle, &numCameras, 1);
        fflush(stdout);
        if (numCameras<1){
                fprintf(stderr, "No cameras found :( \n");
                dc1394_destroy_handle(handle);
                return -1;
        }
        else{
                cout<<"dma1394:"<< numCameras<<" cameras found. \n";
        }
        printf("dma1394: Working with the first camera on the bus.\n");
        if(camera_nodes[0] == numNodes-1){
                fprintf(stderr, "\n" "dma1394: Sorry, your camera is the highest numbered node.\n");
                dc1394_destroy_handle(handle);
                dc1394_free_camera_nodes(camera_nodes);
                return -1;
        }

/*Step 3: Setup Capture*/
	/*=====================================================================*/
	/*Using camera functions to get the params by querying them*/
	cout<<"INFO FOR DEBUG: \n"
                        "num_dma_buffers: "<< camera.num_dma_buffers<<"\n";
        dc1394_get_iso_channel_and_speed(handle, camera_nodes[0], &channel, &speed); /*get channel and speed*/
	dc1394_get_video_format(handle, camera_nodes[0], &format); /*get format*/
	dc1394_get_video_framerate(handle, camera_nodes[0], &framerate); /*get framerate*/
	dc1394_get_video_mode(handle, camera_nodes[0], &mode); /*get mode*/
	cout<<"dc1394: Got parameters from the camera.\n"
                "=======================================\n"
                "Channel: "<< channel<< " \n"
                "Speed: " <<speed <<" \n"
                "Format: "<< format <<" \n"
                "Framerate: " <<framerate<< "\n"
                "Mode: "<< mode <<"\n";
        camera.num_dma_buffers = 8; /* set the dma buffers */
        camera.drop_frames = 1; /* set the number of drop frames */
        camera.dma_device_file = NULL;
        if(dc1394_dma_setup_capture(handle, camera_nodes[0], channel, format, mode, speed, framerate, camera.num_dma_buffers, camera.drop_frames, camera.dma_device_file, &camera) !=DC1394_SUCCESS){
                fprintf(stderr, "dma1394: Unable to setup camera.\n"
                                        "Check line %d of %s to ensure that the options set are supported by your camera.\n", __LINE__, __FILE__);
                dc1394_destroy_handle(handle);
                dc1394_free_camera_nodes(camera_nodes);
                return -1;
        }
        else{
                printf("dma1394: Capture has been setup.\n");
        }
        dc1394_free_camera_nodes(camera_nodes);

        //Set Trigger Mode -- Generally not required thus I will comment it out.
	/*if(dc1394_set_trigger_mode(handle, camera.node, TRIGGER_MODE_0) != DC1394_SUCCESS){
                fprintf(stderr, "dma1394: Unable to set the camera trigger mode. Refer to line %d in %s.\n", __LINE__, __FILE__);
                dc1394_release_camera(handle, &camera);
                dc1394_destroy_handle(handle);
        }
        else{
                printf("dma1394: Successfully set trigger mode.\n");
        }*/

        /*Step 4: Start sending data */
	/*=======================================================*/
	if(dc1394_start_iso_transmission(handle, camera.node) != DC1394_SUCCESS){
                fprintf(stderr, "dma1394: Unable to start the data transmission.\n");
                dc1394_dma_done_with_buffer(&camera);
				dc1394_dma_release_camera(handle, &camera);
                dc1394_destroy_handle(handle);
                return -1;
        }
        else{
                printf("dma1394: Success.  Data Transmission started.\n");
        }

        /*Step 5: Capture Something...Anything...PLEASE*/
	/*===============================================================*/
	if(dc1394_dma_single_capture(&camera) != DC1394_SUCCESS){
                fprintf(stderr, "dma1394; DAIM, can't capture a single frame.\n");
				dc1394_dma_done_with_buffer(&camera); /*important step */
                dc1394_dma_release_camera(handle, &camera);
                dc1394_destroy_handle(handle);
                return -1;
        }
        else{
                printf("dma1394: GREAT SUCCESS! Captured a single frame.\n");
        }

        /*Step 6: Stop sending data*/
	/*==================================================*/
	if(dc1394_dma_unlisten(handle, &camera) != DC1394_SUCCESS){
        		fprintf(stderr, "Can't unlisten iso channel! \n");
        }
        else{
                printf("dma1394: DMA unlistened. \n");
        }

	if(dc1394_stop_iso_transmission(handle, camera.node) != DC1394_SUCCESS){
                fprintf(stderr, " Can't stop the camera!! \n");
        }
        else{
                printf("dma1394: Data transmission terminated. \n");
        }

        /*Step 7: Save our image*/
	/*===============================================================*/
	imagefile=fopen(IMAGE_FILE_NAME, "w");
        if(imagefile==NULL){
                perror("dma1394: Can't create' "IMAGE_FILE_NAME" ' ");
                dc1394_dma_done_with_buffer(&camera);
				dc1394_dma_release_camera(handle, &camera);
                dc1394_destroy_handle(handle);
                return -1;
        }
        else{
                cout<<"dma1394: Saved image in "<<IMAGE_FILE_NAME<<".\n";
        }
         /*Add pgm file header*/
	fprintf(imagefile, "P5\n%u %u 255\n", camera.frame_width, camera.frame_height);

		/*write to file*/
	fwrite((const char *)camera.capture_buffer, 1, camera.frame_height*camera.frame_width, imagefile);
        fclose(imagefile);
        printf("dma1394: wrote: " IMAGE_FILE_NAME "\n");

        /*Step 8: Close camera*/
	/*=============================================================*/
	dc1394_dma_done_with_buffer(&camera);
	dc1394_dma_release_camera(handle, &camera);
        dc1394_destroy_handle(handle);
        printf("dma1394: Camera released.  Exiting. \n");

        //Step END
	return 0;

}
|
就像之前的示例(第 4.4 节)一样,该程序包括必要的头文件 (libraw1394/raw1394.h和libdc1394/dc1394_control.h) 然后声明以下数据类型的三个变量
dc1394_cameracapture
raw1394handle_t
nodeid_t *
- 使用函数打开 ohci 并为其分配句柄dc1394_create_handle(0)
- 使用函数获取相机节点dc1394_get_camera_nodes
- 找出在相机设置期间需要传递的各种参数。这是通过使用以下函数查询相机来完成的
- dc1394_get_iso_channel_and_speed():获取通道和速度信息
- dc1394_get_video_format():获取相机格式
- dc1394_get_video_framerate():获取帧速率信息
- dc1394_get_video_mode():获取相机模式
一旦获得了参数值(帧速率、格式、模式、通道、速度等),它们就会在dc1394_dma_setup_capture中传递,然后设置相机并启用它以捕获视频。对于 DMA,您必须传递 dma 缓冲区数和丢帧参数。
- 设置相机后,dc1394_start_iso_transmission()被调用。此函数启动从相机到总线的数据传输。
- 现在使用dc1394_dma_single_capture()捕获一个帧。此函数会将帧捕获到 dma 缓冲区中
抓取帧后,使用dc1394_dma_done_with_buffer()释放 dma 缓冲区。这是必需的,以便可以重用内存。绝对必要的dc1394_dma_done_with_buffer()总是跟随着dma_capture函数调用
因此,为了捕获多个帧,代码将是for( i=0;i<100 ;i++)/* to capture 100 images*/ { dc1394_dma_single_capture(&camera); dc1394_dma_done_with_buffer(&camera); } - 通过调用dc1394_dma_unlisten()
停止侦听 iso 通道终止数据传输
- 将图像保存到文件,并添加一个 PGM 头部,以便使用 gimp 查看。
- 最后调用dc1394_release_camera来释放相机。
如果 DMA 未正确设置,您将会收到以下错误信息:
VIDEO1394_IOC_LISTEN_CHANNEL ioctl failed
出现此错误的原因有很多,将在“问题”部分(第 4.7 节)中进一步解释。
因此,我们可以看到,使用 DMA 捕获图像与非 DMA 方法没有太大区别。我们将在下表中比较两种方法中使用的函数。
非 DMA 步骤 | DMA 步骤 | 注释 |
dc1394_create_handle | dc1394_create_handle | 创建句柄 |
dc1394_get_camera_nodes | dc1394_get_camera_nodes | 获取相机节点 |
dc1394_setup_capture | dc1394_dma_setup_capture | 调用设置函数来设置相机的各种参数 |
dc1394_start_iso_transmission | dc1394_start_iso_transmission | 开始从相机向总线发送数据 |
dc1394_single_capture | dc1394_dma_single_capture, dc1394_dma_done_with_buffer | 捕获一帧 |
dc1394_stop_iso_transmission | dc1394_dma_unlisten, dc1394_stop_iso_transmission | 停止从相机向总线发送数据 |
dc1394_release_camera, dc1394_destroy_handle | dc1394_dma_done_with_buffer, dc1394_dma_release_camera, dc1394_destroy_handle | 关闭相机 |
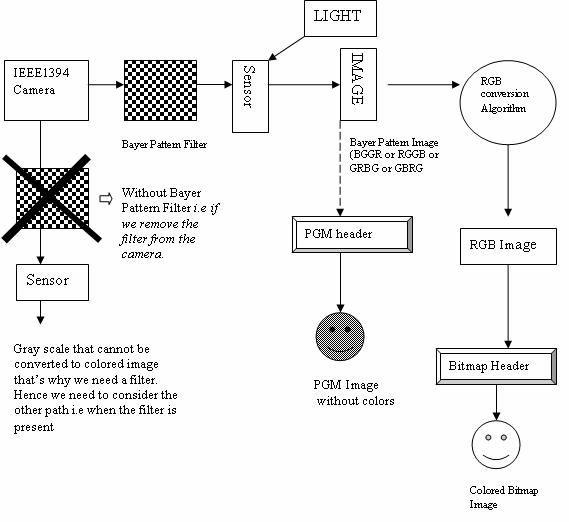
4.6. 如何获取彩色图像:拜耳阵列概念
前面部分示例代码抓取的图像不是彩色的(我们有意使用“不是彩色的”一词,因为图像也不是灰度的)。它实际上是一个拜耳阵列。在本节中,我们将概述拜耳阵列以及如何使用它们来获得彩色图像。
数码相机使用一种叫做图像传感器的固态设备。这些指甲大小的硅芯片包含数百万个称为光电二极管的光敏二极管。当你用数码相机拍照时,照射到传感器上每个光电二极管的光强度被记录为一个信号。根据相机的不同,会记录 12 位或 14 位的数据。在 12 位时,相机可以记录 4,096 个亮度级别。在 14 位时,相机可以记录 16,384 个亮度级别。这被称为位深度。位深度越高,细节越精细,色调之间的过渡越平滑,动态范围(相机在亮部和阴影区域都能保留细节的能力)越高。但在捕获时,数字图像是灰度的,而不是彩色的。为了记录颜色信息,传感器上的每个像素都覆盖有红色、绿色或蓝色滤镜,颜色交替排列。一种常见的颜色滤镜排列是 拜耳阵列,它交替颜色,但同时使用的绿色滤镜是红色和蓝色的两倍。使用两倍的绿色滤镜是因为我们的眼睛对绿色更敏感。这种滤镜的模式或序列可能会有所不同,但广泛采用的拜耳阵列(由柯达发明)是一个重复的 2x2 排列。每个像素仅对一种颜色(一个光谱带)敏感。
一个典型的拜耳阵列看起来像这样
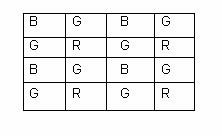
标记为 B 的瓦片或正方形(像素)意味着这个特定的瓦片仅对蓝光敏感,依此类推。
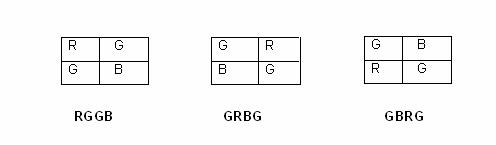
拜耳阵列可以分为 4 种类型,具体取决于我们如何排列颜色。拜耳阵列的命名是通过从阵列的最顶角取一个 2x2 矩阵,并按 (0,0),(0,1),(1,0),(1,1) 的顺序读取颜色来完成的。因此,对于上面的拜耳阵列,如果我们取 2x2 矩阵为
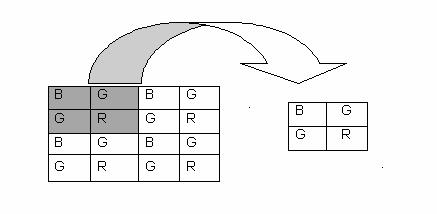
因此,该阵列被称为 BGGR。
其他可能的阵列是
我们在前面的例子中获得的图像是一个拜耳阵列图像,也称为 RAW 图像。它存储在camera.capture_buffer为了查看我们捕获的内容,我们通过添加一个头部将 RAW 图像转换为 .PGM(请参阅 第 4.4 节中的说明)。
为了获得彩色图像,拜耳阵列图像被转换为 RGB 图像。RGB 图像是拜耳阵列图像的增强版本;我们尝试找到每个像素上缺失的两种颜色的值(记住,传感器的每个像素都被拜耳阵列滤镜覆盖,因此默认情况下,我们可以在任何像素上获得单一颜色)。这是通过使用不同的算法完成的,如最近邻、边缘感知等等。
其中阴影值是通过算法计算的。下标表示 R、G 和 B 值所属的拜耳阵列上的瓦片。请注意,图像大小将是拜耳阵列的 3 倍。为了查看 RGB 图像,我们通过添加位图头部将其转换为位图,或 .BMP 图像。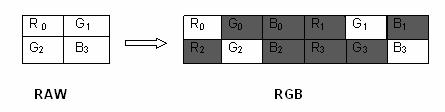
为了清楚地了解发生了什么,我们提供了以下图表
让我们了解 RAW 到 RGB 转换算法是如何工作的。我们将详细了解最近邻算法。以下网址上详细解释了其他算法:http://www-ise.stanford.edu/~tingchen/main.htm。
大多数这些算法都使用某种插值。
4.6.1. 最近邻算法
在这种插值方法中,每个插值输出像素都被分配输入图像中最近像素的值。最近的邻居可以是上方、下方、左侧或右侧的任何一个像素。
一个例子会使逻辑更清晰。我们尝试找到 3x3 块的 R、B 瓦片的 G 值(显示为阴影区域。空白正方形要么带有 R 值,要么带有 B 值。我们没有显示它们只是为了使图更容易理解)。这里我们假设使用左侧相邻像素值来填充缺失的值。
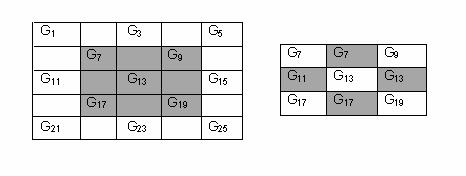
左侧的表格显示了拜耳阵列图像的 G 值。为了找出最初仅包含 R 或 B 的其他正方形的缺失 G 值,我们使用以下方法
找到最近的 G 值正方形,并将该正方形的 G 值复制到 R (B) 正方形上。上图说明了这一点。G7 旁边的正方形的值为 R 或 B。因此,为了获得 G8(正方形 8 的 G 值),我们复制了正方形 7 的 G 值,因为它最近,所以 G8 = G7。类似地,我们填充了其他非 G 值正方形。
在找到绿色正方形的 R 和 B 值时,应用相同的逻辑。
4.6.2. 示例程序,了解如何使用 IEEE1394 相机抓取彩色图像
现在我们已经介绍了 RAW、RGB 和转换算法的基本概念,我们认为您可以理解一个提供彩色图像的示例程序。
我们选择了 Format7 格式,因为我们使用的相机只响应这种格式。我们将使用另一个示例代码,该代码提供了算法的实现。该程序是conversions.cpp, 位于grabdma文件夹中,可在 http://www.ptgrey.com/support/kb/data/grabdma.tgz 下载。
要运行代码,请确保您拥有以下文件
conversions.h
conversions.cpp
grabcolor.cpp- 同样来自grabdma文件夹。我们根据我们的要求修改了代码,并删除了一些行。由于大部分代码与之前讨论的代码相同,我们只解释了不同的部分。这些部分已强调显示。
#include <stdio.h>
#include <libraw1394/raw1394.h>
#include <libdc1394/dc1394_control.h>
#include <stdlib.h>
#include <onversions.h>

#define IMAGE "Image.rgb"

int main(int argc, char *argv[])
{
  FILE* imagefile;
  dc1394_cameracapture camera;
  int numNodes;
  int numCameras;
  raw1394handle_t handle;
  nodeid_t * camera_nodes;
  int channel,speed,mode,bytes_per_packet;

   /* Open ohci and asign handle to it */

    handle = dc1394_create_handle(0);
  if (handle==NULL)
  {
    fprintf( stderr, "Unable to aquire a raw1394 handle\n\n"
       "Please check \n"
         " - if the kernel modules `ieee1394',`raw1394' and `ohci1394' are loaded \n"
         " - if you have read/write access to /dev/raw1394\n\n");
exit(1);
  }

  /* get the camera nodes and describe them as we find them */

  numNodes = raw1394_get_nodecount(handle);
  camera_nodes = dc1394_get_camera_nodes(handle,&numCameras,1);
  fflush(stdout);
  if (numCameras<1)
  {
    fprintf( stderr, "no cameras found :(\n");
    dc1394_destroy_handle(handle);
    exit(1);
  }
  printf("working with the first camera on the bus\n");

  if( camera_nodes[0] == numNodes-1)
  {
    fprintf( stderr, "\n"
           "Sorry, your camera is the highest numbered node\n");
    dc1394_destroy_handle(handle);
    dc1394_free_camera_nodes(camera_nodes);
    exit( 1);
  }

  /*obtain the values of the parameter from the camera */

dc1394_get_video_mode(handle,camera_nodes[0],(unsigned int *)&mode);

dc1394_get_iso_channel_and_speed(handle,camera_nodes[0],
(unsigned int *)&channel, (unsigned int *)&speed);

dc1394_query_format7_byte_per_packet(handle,camera_nodes[0],(unsigned)
mode,&bytes_per_packet);

  /*setup capture */

if (dc1394_setup_format7_capture(handle,
           camera_nodes[0],
         channel , /* channel */
         mode,
         speed,
         bytes_per_packet,
         0,
         0,
         960,
         720,
         &camera)!=DC1394_SUCCESS)
  {
    fprintf( stderr,"unable to setup camera-\n"
         "check line %d of %s to make sure\n"
         "that the video mode,framerate and format are\n"
         "supported by your camera\n",
         __LINE__,__FILE__);
    dc1394_release_camera(handle,&camera);
    dc1394_destroy_handle(handle);
    dc1394_free_camera_nodes(camera_nodes);
    exit(1);
  }
  dc1394_free_camera_nodes(camera_nodes);

  /* have the camera start sending us data*/

  if (dc1394_start_iso_transmission(handle,camera.node)
      !=DC1394_SUCCESS)
  {
    fprintf( stderr, "unable to start camera iso transmission\n");
    dc1394_release_camera(handle,&camera);
    dc1394_destroy_handle(handle);
    exit(1);
  }

  /* capture one frame */

  if (dc1394_single_capture(handle,&camera)!=DC1394_SUCCESS)
  {
    fprintf( stderr, "unable to capture a frame\n");
    dc1394_release_camera(handle,&camera);
    dc1394_destroy_handle(handle);
    exit(1);
  }

  /*query the camera to determine the Bayer pattern*/

quadlet_t qValue;
   GetCameraControlRegister( handle,
              Camera_nodes[0],
              0x1040,/* Bayer Tile Mapping register */
              &qValue );

   bayer_pattern_t pattern = BAYER_PATTERN_BGGR;
   switch( qValue )
   {
      case 0x42474752:/* BGGR */
       pattern = BAYER_PATTERN_BGGR;
       break;
      case 0x47524247:/* GRBG */
       pattern = BAYER_PATTERN_GRBG;
       break;
      case 0x52474742: /* RGGB */
       pattern = BAYER_PATTERN_RGGB;
       break;
      case 0x47425247:/* GBRG */
       pattern = BAYER_PATTERN_GBRG;
       break;
      case 0x59595959:/* YYYY = BW */
       fprintf( stderr, "Camera is black and white\n" );
       cleanup();
       return 1;
      default:
      fprintf(stderr,
          "Camera BAYER_TILE_MAPPING register has an unexpected value:\n"
          "\t0x%x\n", qValue );

      return 1;
   }

   int bufferSize = camera.frame_width*camera.frame_height;

   /* assign a buffer of size three time the original image */

   unsigned char* rgbBuffer = new unsigned char[3 * bufferSize];

   unsigned char* src = (unsigned char*)camera.capture_buffer;

   unsigned char* captureBuffer=
            (unsigned char*)camera.capture_buffer;
   for ( int i = 0; i < bufferSize; i++ )
   {
       src[i] = captureBuffer[ i * bytesPerPixel ];
   }

   /* convert to color image */

   BayerNearestNeighbor (src,
             rgbBuffer,
             camera.frame_width,
             camera.frame_height,
             pattern );


   /* Stop data transmission */

  if (dc1394_stop_iso_transmission(handle,camera.node)!=DC1394_SUCCESS)
  {
  printf("couldn't stop the camera?\n");
  }

  /* save image as 'Image.rgb' without adding any pgm header */

  printf( "Saving the image...\n" );
  imagefile = fopen( IMAGE, "w" );

  fwrite( rgbBuffer, 3,
         bufferSize, imagefile );

  fclose( imagefile );

  /* Close camera */

  dc1394_release_camera(handle,&camera);
  dc1394_destroy_handle(handle);
  return 0;
}
|
正如我们已经讨论过的GetCameraControlRegister的用法,您可以理解它已被用于找出0x1040处包含的值。Libdc1394 不提供任何函数来查询此地址,因此我们显式地使用此调用来获取该值。
重要的是要理解上述函数调用的实用性。请参阅我们在上一节中关于拜耳阵列滤镜的讨论。我们知道模式可以是 BGGR、RGGB、GRBG 和 GRBG。我们用于将拜耳阵列转换为 RGB 的算法需要了解相机滤镜的模式类型,以便它可以进行一些初始化(请参阅conversions.cpp了解详情)。函数调用中的第四个参数
   BayerNearestNeighbor (src,
             rgbBuffer,
             camera.frame_width,
             camera.frame_height,
             pattern )
|
指的是这个值。
BayerNearestNeighbor是我们在上一节中讨论的插值算法的函数调用。它在conversions.cpp.
中实现。理解了这一点,我们继续讨论 switch-cases。为拜耳阵列获得的值 (qvalue) 是十六进制形式,需要解码才能设置变量的值pattern.
case 语句指示了可以由各种相机返回的与拜耳阵列相关的各种十六进制值。这些看似可怕的值实际上很容易解码。这里有一个技巧
各种颜色的十六进制代码如下
42h -> B
47h -> G
52h -> R
现在,如果qvalue包含 0x42474752,则表示:B (42h) G (47h) G (47h) R (52h) 或 BGGR。因此,我们可以类似地解码所有 case 语句。
最后,我们需要声明另一个图像缓冲区,它将包含 RGB 图像。请记住,RGB 的大小是拜耳阵列图像大小的 3 倍。rgbbuffer因此被分配了 3 倍的缓冲区大小 (camera.capture_buffer)。此缓冲区 (rgbbuffer) 将作为目标缓冲区传递(BayerNearestNeighbor).
中的第二个参数)。在缓冲区填充了 RGB 值后,我们将其写入文件image.rgb.
为了使用 gimp 查看此图像,我们需要附加一个位图头部。我们采用的方法如下
将 RGB 图像缓冲区保存在一个文件中,例如image.rgb.
制作一个位图头部并将其保存在一个单独的文件中,bmpheader。有关头部详细信息,请参阅 http://www.fortunecity.com/skyscraper/windows/364/bmpffrmt.html。
cat bmpheader image.rgb > bmpfile
打开bmpfile使用 gimp。
为了运行程序,请使用以下步骤
g++ -c conversions.cpp g++ -o grabcolor conversions.o grabcolor.cpp -lraw1394 -ldc1394_control |
| 关于可用算法的说明 |
|---|---|
中有许多可用的算法conversions.cpp,因此您可以根据需求调用必要的函数。 |
Coriander 应用程序可用于找出 RGB 图像在经过不同的转换算法后会是什么样子。例如,它提供了最近邻、边缘感知和降采样转换算法之间的选择。只需单击鼠标即可观察到差异。
4.7. 使用 IEEE1394 相机时遇到的常见问题
现在我们来看一下使用相机时遇到的一些常见问题,但我们只列出了我们遇到的那些问题。任何使用该库和相机的人都可能会遇到这些问题。一些问题通过合理的推理得到解决,但一些问题只是通过尝试和错误来解决的。以下列出了这些问题及其解决方案。
问题 #1. 在安装了库和模块后,相机没有响应
解决方案:我们断开相机并重新连接。可能需要多次重复此操作。我们无法找出适当的原因,但它有效。
问题 #2. 程序无法编译
解决方案:如果忘记将可执行文件与 raw1394 和 dc1394_control 链接,则程序将无法编译。正确的方法是
gcc -o xx xx.c -lraw1394 -ldc1394_control /*for C files*/
g++ -o xx xx.cpp -lraw1394 -ldc1394_control /* for Cpp files */
问题 #3. 编译失败,出现错误libdc1394_control.so.13: cannot open the shared object file.
解决方案: 检查环境变量 LD_LIBRARY_PATH。 它应该包含共享库的路径。 在我们的系统中,路径是 /usr/local/lib。 必须相应地设置路径。
问题 #4. 程序在执行时挂起。
解决方案: 这主要是因为传递给 setup 函数的参数值不受摄像机支持。 例如,设置不支持的 mode_640x480_MONO16 模式。 我们的建议是,应该始终查询这些值,然后将它们传递给函数(如 第 4.4 节 中的示例代码中所述)。
问题 #5.IDEO1394_IOC_LISTEN_CHANNEL ioctl 失败显示的错误消息。
解决方案: (由 Ian 和 Tim 提供). 出现此错误消息的原因有很多。 在命令提示符下键入 dmesg,以更好地了解问题。 以下是我们遇到的问题列表 [1]
问题 #6. 使用 CTRL+C 终止图像采集程序,但下次运行该程序时,它会挂起。
解决方案: 通常发生此错误是因为摄像机的功能类似于管道,如果在未刷新内存通道的情况下终止,则会遇到管道中断的情况。 诀窍是断开摄像机的连接,然后重新连接。 也可以尝试通过重新安装 ohci1394、video1394、raw1394、video1394 模块来调试问题,但偶尔有效。
问题 #7. 每个参数都正确,安装也没有问题,但即使这样,当程序执行时,仍然无法检测到摄像机。
解决方案: 这是一个奇怪的问题,我们也经常遇到。 该解决方案基于反复试验,但它始终有效:
首先断开摄像机的连接,然后重新连接。
现在运行 Coriander(这就是为什么我们建议您在开始使用相机之前安装 Coriander)。
进行所有必要的调整; 例如,选择摄像机的模式、帧大小等等。
关闭 Coriander。
执行您的程序。
关于上面第一步的说明 第一步至关重要,因为如果我们未在运行 Coriander 之前断开并重新连接摄像机,我们就会收到来自 Coriander 的关于找不到摄像机的错误消息。