Linux 内核模块编程指南
Peter Jay SalzmanMichael Burian
Ori Pomerantz
版权所有 © 2001 Peter Jay Salzman
2007-05-18 ver 2.6.4
《Linux 内核模块编程指南》是一本免费书籍;您可以根据开放软件许可证 1.1 版的条款复制和/或修改它。您可以在 https://open-source.org.cn/licenses/osl.php 获取此许可证的副本。
本书的发布是希望它能对您有所帮助,但不作任何担保,甚至不包含对适销性或特定用途适用性的暗示担保。
作者鼓励广泛传播本书,供个人或商业用途使用,前提是上述版权声明保持完整,并且传播方法符合开放软件许可证的规定。 概括来说,您可以免费或盈利地复制和分发本书。 在任何媒介(物理或电子媒介)中复制本书均无需作者的明确许可。
本文档的衍生作品和翻译版本必须置于开放软件许可证之下,并且原始版权声明必须保持完整。 如果您为本书贡献了新材料,则必须提供您修订的材料和源代码。 请将修订和更新直接提供给文档维护者 Peter Jay Salzman<p@dirac.org>. 这将允许合并更新,并为 Linux 社区提供一致的修订版本。
如果您以商业方式出版或分发本书,作者和 Linux 文档项目 (LDP) 将非常感谢您的捐赠、版税和/或印刷本。 以这种方式贡献表明您对自由软件和 LDP 的支持。 如果您有任何问题或意见,请联系上述地址。
- 目录
- 前言
- 第 1 章. 导言
- 第 2 章. Hello World
- 2.1. Hello, World (第 1 部分):最简单的模块
- 2.2. 编译内核模块
- 2.3. Hello World (第 2 部分)
- 2.4. Hello World (第 3 部分):__init 和 __exit 宏
- 2.5. Hello World (第 4 部分):许可和模块文档
- 2.6. 向模块传递命令行参数
- 2.7. 跨越多个文件的模块
- 2.8. 为预编译内核构建模块
- 第 3 章. 预备知识
- 3.1. 模块与程序
- 第 4 章. 字符设备文件
- 4.1. 字符设备驱动程序
- 第 5 章. /proc 文件系统
- 5.1. /proc 文件系统
- 5.2. 读取和写入 /proc 文件
- 5.3. 使用标准文件系统管理 /proc 文件
- 5.4. 使用 seq_file 管理 /proc 文件
- 第 6 章. 使用 /proc 进行输入
- 6.1. TODO:编写关于 sysfs 的章节
- 第 7 章. 与设备文件对话
- 7.1. 与设备文件对话(写入和 IOCTL)
- 第 8 章. 系统调用
- 8.1. 系统调用
- 第 9 章. 阻塞进程
- 9.1. 阻塞进程
- 第 10 章. 替换 Printks
- 第 11 章. 调度任务
- 11.1. 调度任务
- 第 12 章. 中断处理程序
- 12.1. 中断处理程序
- 第 13 章. 对称多处理
- 13.1. 对称多处理
- 第 14 章. 常见陷阱
- 14.1. 常见陷阱
- 附录 A. 变更:2.0 到 2.2
- A.1. 2.4 和 2.6 之间的变更
- 附录 B. 后续学习方向
- B.1. 后续方向?
- 索引
- 图表列表
- 5-1. seq_file 的工作原理
- 示例列表
- 2-1. hello-1.c
- 2-2. 基本内核模块的 Makefile
- 2-3. hello-2.c
- 2-4. 我们两个模块的 Makefile
- 2-5. hello-3.c
- 2-6. hello-4.c
- 2-7. hello-5.c
- 2-8. start.c
- 2-9. stop.c
- 2-10. Makefile
- 4-1. chardev.c
- 5-1. procfs1.c
- 5-2. procfs2.c
- 5-3. procfs3.c
- 5-4. procfs4.c
- 7-1. chardev.c
- 7-2. chardev.h
- 7-3. ioctl.c
- 8-1. syscall.c
- 9-1. sleep.c
- 9-2. cat_noblock.c
- 10-1. print_string.c
- 10-2. kbleds.c
- 11-1. sched.c
- 12-1. intrpt.c
前言
1. 作者
《Linux 内核模块编程指南》最初由 Ori Pomerantz 为 2.2 内核编写。 最终,Ori 没有时间维护该文档。 毕竟,Linux 内核是一个快速发展的目标。 Peter Jay Salzman 接手维护并将其更新为 2.4 内核。 最终,Peter 没有时间跟进 2.6 内核的开发,因此 Michael Burian 成为联合维护者,以更新文档以适应 2.6 内核。
2. 版本和说明
Linux 内核是一个不断变化的目标。 关于 LKMPG 是否应该删除已弃用的信息或保留它以作历史记录,一直存在疑问。 Michael Burian 和我决定为每个新的稳定内核版本创建一个新的 LKMPG 分支。 因此,LKMPG 2.4.x 版本将针对 Linux 内核 2.4,而 LKMPG 2.6.x 版本将针对 Linux 内核 2.6。 不会尝试存档历史信息; 希望获得此信息的人员应阅读相应版本的 LKMPG。
源代码和讨论应适用于大多数架构,但我无法保证任何事情。 一个例外是第 12 章,中断处理程序,它不应在 x86 以外的任何架构上工作。
第 1 章. 导言
1.1. 什么是内核模块?
因此,您想编写一个内核模块。 您了解 C 语言,您编写了一些作为进程运行的普通程序,现在您想进入真正的操作发生的地方,在那里,一个野指针可以擦除您的文件系统,而核心转储意味着重新启动。
内核模块到底是什么? 模块是可以按需加载和卸载到内核中的代码片段。 它们扩展了内核的功能,而无需重新启动系统。 例如,模块的一种类型是设备驱动程序,它允许内核访问连接到系统的硬件。 如果没有模块,我们将不得不构建单内核,并将新功能直接添加到内核镜像中。 除了内核更大之外,这还具有每次想要新功能时都需要重建和重新启动内核的缺点。
1.2. 模块如何进入内核?
您可以通过运行 lsmod 查看已加载到内核中的模块,它通过读取文件获取其信息/proc/modules.
这些模块是如何进入内核的? 当内核需要内核中不存在的功能时,内核模块守护进程 kmod[1] 执行 modprobe 以加载模块。 modprobe 传递一个字符串,格式为以下两种之一
类似以下的模块名称softdog或ppp.
更通用的标识符,例如char-major-10-30.
如果 modprobe 收到一个通用标识符,它首先在文件/etc/modprobe.conf中查找该字符串。[2] 如果它找到类似以下的别名行
alias char-major-10-30 softdog |
它知道通用标识符指的是模块softdog.ko.
接下来,modprobe 查找文件/lib/modules/version/modules.dep,以查看在加载请求的模块之前是否必须加载其他模块。 此文件由 depmod -a 创建,包含模块依赖项。 例如,msdos.ko需要fat.ko模块已加载到内核中。 如果另一个模块定义了请求的模块使用的符号(变量或函数),则请求的模块对另一个模块具有依赖性。
最后,modprobe 使用 insmod 首先将任何先决条件模块加载到内核中,然后加载请求的模块。 modprobe 指示 insmod 从/lib/modules/version/[3],模块的标准目录加载。 insmod 的目的在于使其对模块的位置相当迟钝,而 modprobe 知道模块的默认位置,知道如何找出依赖关系并按正确的顺序加载模块。 因此,例如,如果您想加载 msdos 模块,您必须运行
insmod /lib/modules/2.6.11/kernel/fs/fat/fat.ko insmod /lib/modules/2.6.11/kernel/fs/msdos/msdos.ko |
或
modprobe msdos |
我们在这里看到的是: insmod 要求您传递完整路径名并按正确的顺序插入模块,而 modprobe 只需接受名称,无需任何扩展名,并通过解析/lib/modules/version/modules.dep.
Linux 发行版提供 modprobe、insmod 和 depmod 作为名为 module-init-tools 的软件包。 在以前的版本中,该软件包称为 modutils。 一些发行版还设置了一些包装器,允许并行安装这两个软件包,并执行正确的操作,以便能够处理 2.4 和 2.6 内核。 只要用户运行的是这些工具的最新版本,他们就不需要关心细节。
现在您知道模块是如何进入内核的了。 如果您想编写自己的依赖于其他模块的模块(我们称之为“堆叠模块”),那么还有更多的内容。 但这必须等到以后的章节再说。 在解决这个相对高级的问题之前,我们还有很多内容要介绍。
1.2.1. 开始之前
在我们深入研究代码之前,我们需要讨论一些问题。 每个人的系统都不同,每个人都有自己的习惯。 让您的第一个“hello world”程序正确编译和加载有时可能是一个技巧。 请放心,在您第一次克服最初的障碍之后,一切都将一帆风顺。
1.2.1.1. 模块版本控制
为某个内核编译的模块如果引导到不同的内核,将无法加载,除非您启用CONFIG_MODVERSIONS在内核中。 我们将在本指南的后面部分讨论模块版本控制。 在我们介绍模块版本控制之前,如果您运行的内核启用了模块版本控制,本指南中的示例可能无法工作。 但是,大多数 Linux 发行版内核都默认启用它。 如果您因为版本控制错误而无法加载模块,请编译一个禁用模块版本控制的内核。
1.2.1.2. 使用 X
强烈建议您键入、编译和加载本指南讨论的所有示例。 还强烈建议您从控制台执行此操作。 您不应该在 X 中处理这些东西。
模块无法像printf()那样打印到屏幕,但它们可以记录信息和警告,最终会在屏幕上打印出来,但仅在控制台上。 如果您从 xterm 插入模块,信息和警告将被记录,但仅记录到您的日志文件中。 除非您查看日志文件,否则您看不到它。 为了立即访问此信息,请从控制台完成所有工作。
1.2.1.3. 编译问题和内核版本
通常,Linux 发行版会分发以各种非标准方式修补过的内核源代码,这可能会导致问题。
一个更常见的问题是,某些 Linux 发行版分发不完整的内核头文件。 您需要使用 Linux 内核中的各种头文件来编译您的代码。 墨菲定律指出,缺少的头文件正是您模块工作所需的头文件。
为了避免这两个问题,我强烈建议您下载、编译并引导到一个全新的、标准的 Linux 内核,该内核可以从任何 Linux 内核镜像站点下载。 有关更多详细信息,请参阅 Linux 内核 HOWTO。
具有讽刺意味的是,这也可能导致问题。 默认情况下,系统上的 gcc 可能会在其默认位置查找内核头文件,而不是您安装新内核副本的位置(通常在/usr/src/中)。 这可以通过使用 gcc 的-I开关来解决。
第 2 章. Hello World
2.1. Hello, World (第 1 部分):最简单的模块
当第一个穴居人程序员在第一个洞穴计算机的墙壁上凿刻第一个程序时,它是一个用羚羊图片绘制字符串“Hello, world”的程序。 罗马编程教科书以“Salut, Mundi”程序开头。 我不知道那些打破这一传统的人会发生什么,但我认为最好不要弄清楚。 我们将从一系列 hello world 程序开始,这些程序演示了编写内核模块基础知识的不同方面。
这是最简单的模块。 暂时不要编译它; 我们将在下一节介绍模块编译。
示例 2-1. hello-1.c
/*
 *  hello-1.c - The simplest kernel module.
 */
#include <linux/module.h>	/* Needed by all modules */
#include <linux/kernel.h>	/* Needed for KERN_INFO */

int init_module(void)
{
	printk(KERN_INFO "Hello world 1.\n");

	/*
	 * A non 0 return means init_module failed; module can't be loaded.
	 */
	return 0;
}

void cleanup_module(void)
{
	printk(KERN_INFO "Goodbye world 1.\n");
} |
内核模块必须至少有两个函数:一个“启动”(初始化)函数,名为init_module(),当模块 insmoded 到内核中时调用,以及一个“结束”(清理)函数,名为cleanup_module(),在 rmmoded 之前调用。 实际上,从内核 2.3.13 开始,情况发生了变化。 您现在可以使用您喜欢的任何名称作为模块的启动和结束函数,您将在 第 2.3 节中学习如何执行此操作。 事实上,新方法是首选方法。 但是,许多人仍然使用init_module()和cleanup_module()作为他们的启动和结束函数。
通常,init_module()要么向内核注册某个处理程序,要么将其内核函数之一替换为自己的代码(通常是执行某些操作然后调用原始函数的代码)。cleanup_module()函数应该撤消init_module()所做的一切,以便可以安全地卸载模块。
最后,每个内核模块都需要包含linux/module.h。 我们需要包含linux/kernel.h仅用于printk()日志级别的宏扩展,KERN_ALERT,您将在 第 2.1.1 节中了解它。
2.1.1. 介绍printk()
尽管您可能认为,printk()并非旨在向用户传达信息,即使我们在 hello-1 中正是为此目的使用它! 它恰好是内核的日志记录机制,用于记录信息或发出警告。 因此,每个printk()语句都带有一个优先级,即您看到的<1>和KERN_ALERT。 共有 8 个优先级,内核为它们提供了宏,因此您不必使用神秘的数字,您可以在linux/kernel.h中查看它们(及其含义)。 如果您不指定优先级,则将使用默认优先级DEFAULT_MESSAGE_LOGLEVEL。
花时间阅读优先级宏。 头文件还描述了每个优先级的含义。 在实践中,不要使用数字,例如<4>。 始终使用宏,例如KERN_WARNING.
。 如果优先级低于int console_loglevel,则消息将打印在您当前的终端上。 如果 syslogd 和 klogd 都在运行,则消息也将附加到/var/log/messages,无论它是否已打印到控制台。 我们使用高优先级,例如KERN_ALERT,以确保printk()消息打印到您的控制台,而不仅仅是记录到您的日志文件中。 当您编写真正的模块时,您将希望使用对当前情况有意义的优先级。
2.2. 编译内核模块
内核模块的编译方式与常规用户空间应用程序略有不同。 以前的内核版本要求我们非常关心这些设置,这些设置通常存储在 Makefile 中。 虽然是分层组织的,但许多冗余设置累积在子级 Makefile 中,使它们变得庞大且难以维护。 幸运的是,现在有一种新的方法来做这些事情,称为 kbuild,外部可加载模块的构建过程现在已完全集成到标准内核构建机制中。 要了解有关如何编译不属于官方内核的模块(例如您在本指南中找到的所有示例)的更多信息,请参阅文件linux/Documentation/kbuild/modules.txt.
因此,让我们看一下用于编译名为hello-1.c:
的模块的简单 Makefile
obj-m += hello-1.o all: make -C /lib/modules/$(shell uname -r)/build M=$(PWD) modules clean: make -C /lib/modules/$(shell uname -r)/build M=$(PWD) clean |
示例 2-2. 基本内核模块的 Makefile
从技术角度来看,只有第一行是真正必要的,“all”和“clean”目标是为了纯粹的方便而添加的。
hostname:~/lkmpg-examples/02-HelloWorld# make make -C /lib/modules/2.6.11/build M=/root/lkmpg-examples/02-HelloWorld modules make[1]: Entering directory `/usr/src/linux-2.6.11' CC [M] /root/lkmpg-examples/02-HelloWorld/hello-1.o Building modules, stage 2. MODPOST CC /root/lkmpg-examples/02-HelloWorld/hello-1.mod.o LD [M] /root/lkmpg-examples/02-HelloWorld/hello-1.ko make[1]: Leaving directory `/usr/src/linux-2.6.11' hostname:~/lkmpg-examples/02-HelloWorld# |
现在您可以通过发出命令 make 来编译模块。 您应该获得类似于以下的输出请注意,内核 2.6 引入了一种新的文件命名约定:内核模块现在有一个.ko扩展名(代替旧的.o
扩展名),这很容易将它们与传统的对象文件区分开来。 这样做的原因是它们包含一个额外的 .modinfo 部分,其中保存了有关模块的其他信息。 我们很快就会看到这些信息有什么用。
hostname:~/lkmpg-examples/02-HelloWorld# modinfo hello-1.ko filename: hello-1.ko vermagic: 2.6.11 preempt PENTIUMII 4KSTACKS gcc-3.3 depends: |
使用 modinfo hello-*.ko 查看它是什么类型的信息。到目前为止,没有什么特别的。 一旦我们在后面的示例之一中使用了 modinfo,情况就会发生变化,.
hostname:~/lkmpg-examples/02-HelloWorld# modinfo hello-5.ko filename: hello-5.ko license: GPL author: Peter Jay Salzman vermagic: 2.6.11 preempt PENTIUMII 4KSTACKS gcc-3.3 depends: parm: myintArray:An array of integers (array of int) parm: mystring:A character string (charp) parm: mylong:A long integer (long) parm: myint:An integer (int) parm: myshort:A short integer (short) hostname:~/lkmpg-examples/02-HelloWorld# |
hello-5.ko
这里有很多有用的信息可看。 用于错误报告的作者字符串,许可证信息,甚至简要描述了它接受的参数。有关内核模块 Makefile 的更多详细信息,请参见linux/Documentation/kbuild/makefiles.txt
。 在开始破解 Makefile 之前,请务必阅读此文件和相关文件。 它可能会为您节省大量工作。
现在是时候使用 insmod ./hello-1.ko 将您新编译的模块插入内核了(忽略您看到的有关 tainted kernels 的任何内容;我们稍后会介绍)。/proc/modules加载到内核中的所有模块都列在/var/log/messages中。 继续并 cat 该文件以查看您的模块是否真的是内核的一部分。 恭喜,您现在是 Linux 内核代码的作者! 当新鲜感消失后,使用 rmmod hello-1 从内核中删除您的模块。 看一下
只是为了看看它是否已记录到您的系统日志文件中。init_module()这是给读者的另一个练习。 看看
中 return 语句上方的注释? 将返回值更改为负数,重新编译并再次加载模块。 会发生什么?
2.3. Hello World (第 2 部分)
从 Linux 2.4 开始,您可以重命名模块的 init 和 cleanup 函数; 它们不再必须被称为init_module()和cleanup_module()和分别。 这是通过和module_init()module_exit()宏完成的。 这些宏在linux/init.h
中定义。 唯一的注意事项是,您的 init 和 cleanup 函数必须在调用宏之前定义,否则您将收到编译错误。 这是这种技术的一个示例
/*
 *  hello-2.c - Demonstrating the module_init() and module_exit() macros.
 *  This is preferred over using init_module() and cleanup_module().
 */
#include <linux/module.h>	/* Needed by all modules */
#include <linux/kernel.h>	/* Needed for KERN_INFO */
#include <linux/init.h>		/* Needed for the macros */

static int __init hello_2_init(void)
{
	printk(KERN_INFO "Hello, world 2\n");
	return 0;
}

static void __exit hello_2_exit(void)
{
	printk(KERN_INFO "Goodbye, world 2\n");
}

module_init(hello_2_init);
module_exit(hello_2_exit); |
示例 2-3. hello-2.c
因此,现在我们已经掌握了两个真正的内核模块。 添加另一个模块就像这样简单
obj-m += hello-1.o obj-m += hello-2.o all: make -C /lib/modules/$(shell uname -r)/build M=$(PWD) modules clean: make -C /lib/modules/$(shell uname -r)/build M=$(PWD) clean |
示例 2-4. 我们两个模块的 Makefile现在看看linux/drivers/char/Makefile以获得一个真实的示例。 如您所见,有些东西被硬编码到内核中 (obj-y),但是所有那些 obj-m 都去哪儿了? 熟悉 shell 脚本的人可以很容易地发现它们。 对于那些不熟悉的人,您到处看到的 obj-$(CONFIG_FOO) 条目会扩展为 obj-y 或 obj-m,具体取决于 CONFIG_FOO 变量是否已设置为 y 或 m。 同时,这些正是您在linux/.config
文件中设置的变量类型,上次您说 make menuconfig 或类似的内容时。2.4. Hello World (第 3 部分):和__init__exit
宏2.4. Hello World (第 3 部分):这演示了内核 2.2 及更高版本的一个功能。 注意 init 和 cleanup 函数定义中的变化。
宏导致 init 函数在内置驱动程序(而不是可加载模块)的 init 函数完成后被丢弃并释放其内存。 如果您考虑何时调用 init 函数,这完全有道理。还有一个__initdata2.4. Hello World (第 3 部分):,其工作方式类似于
,但用于 init 变量而不是函数。__init当模块内置到内核中时,__init宏会导致省略该函数,并且像
一样,对可加载模块没有影响。 同样,如果您考虑何时运行 cleanup 函数,这完全有道理; 内置驱动程序不需要 cleanup 函数,而可加载模块需要。宏完成的。 这些宏在这些宏在中定义,用于释放内核内存。 当您启动内核并看到类似Freeing unused kernel memory: 236k freed
的内容时,这正是内核正在释放的内容。
/*
 *  hello-3.c - Illustrating the __init, __initdata and __exit macros.
 */
#include <linux/module.h>	/* Needed by all modules */
#include <linux/kernel.h>	/* Needed for KERN_INFO */
#include <linux/init.h>		/* Needed for the macros */

static int hello3_data __initdata = 3;

static int __init hello_3_init(void)
{
	printk(KERN_INFO "Hello, world %d\n", hello3_data);
	return 0;
}

static void __exit hello_3_exit(void)
{
	printk(KERN_INFO "Goodbye, world 3\n");
}

module_init(hello_3_init);
module_exit(hello_3_exit); |
示例 2-5. hello-3.c
2.5. Hello World (第 4 部分):许可和模块文档
# insmod xxxxxx.o Warning: loading xxxxxx.ko will taint the kernel: no license See http://www.tux.org/lkml/#export-tainted for information about tainted modules Module xxxxxx loaded, with warnings |
如果您运行的是内核 2.4 或更高版本,您可能在加载专有模块时注意到类似这样的内容在内核 2.4 及更高版本中,设计了一种机制来识别在 GPL(及其朋友)下许可的代码,以便可以警告人们该代码不是开源的。 这是通过MODULE_LICENSE()linux/module.h:
/* * The following license idents are currently accepted as indicating free * software modules * * "GPL" [GNU Public License v2 or later] * "GPL v2" [GNU Public License v2] * "GPL and additional rights" [GNU Public License v2 rights and more] * "Dual BSD/GPL" [GNU Public License v2 * or BSD license choice] * "Dual MIT/GPL" [GNU Public License v2 * or MIT license choice] * "Dual MPL/GPL" [GNU Public License v2 * or Mozilla license choice] * * The following other idents are available * * "Proprietary" [Non free products] * * There are dual licensed components, but when running with Linux it is the * GPL that is relevant so this is a non issue. Similarly LGPL linked with GPL * is a GPL combined work. * * This exists for several reasons * 1. So modinfo can show license info for users wanting to vet their setup * is free * 2. So the community can ignore bug reports including proprietary modules * 3. So vendors can do likewise based on their own policies */ |
宏完成的,该宏在下一段代码中进行了演示。 通过将许可证设置为 GPL,您可以阻止打印警告。 此许可证机制在中定义和记录。类似地,MODULE_DESCRIPTION()用于描述模块的功能,MODULE_AUTHOR()声明模块的作者,以及
MODULE_SUPPORTED_DEVICE()linux/module.h声明模块支持的设备类型。这些宏都在中定义,并且内核本身不使用它们。 它们仅用于文档,可以通过 objdump 之类的工具查看。 作为给读者的练习,尝试在
linux/drivers中搜索这些宏,以查看模块作者如何使用这些宏来记录他们的模块。我建议在
/usr/src/linux-2.6.x/中搜索这些宏,以查看模块作者如何使用这些宏来记录他们的模块。中使用类似 grep -inr MODULE_AUTHOR * 的命令。 不熟悉命令行工具的人可能会喜欢一些基于 Web 的解决方案,搜索提供使用 LXR 索引的内核树的站点。 (或在您的本地机器上设置它)。
传统 Unix 编辑器(如 emacs 或 vi )的用户也会发现标签文件很有用。 它们可以通过 make tags 或 make TAGS 在
/*
 *  hello-4.c - Demonstrates module documentation.
 */
#include <linux/module.h>	/* Needed by all modules */
#include <linux/kernel.h>	/* Needed for KERN_INFO */
#include <linux/init.h>		/* Needed for the macros */
#define DRIVER_AUTHOR "Peter Jay Salzman <p@dirac.org>"
#define DRIVER_DESC   "A sample driver"

static int __init init_hello_4(void)
{
	printk(KERN_INFO "Hello, world 4\n");
	return 0;
}

static void __exit cleanup_hello_4(void)
{
	printk(KERN_INFO "Goodbye, world 4\n");
}

module_init(init_hello_4);
module_exit(cleanup_hello_4);

/*
 *  You can use strings, like this:
 */

/*
 * Get rid of taint message by declaring code as GPL.
 */
MODULE_LICENSE("GPL");

/*
 * Or with defines, like this:
 */
MODULE_AUTHOR(DRIVER_AUTHOR);	/* Who wrote this module? */
MODULE_DESCRIPTION(DRIVER_DESC);	/* What does this module do */

/*
 *  This module uses /dev/testdevice.  The MODULE_SUPPORTED_DEVICE macro might
 *  be used in the future to help automatic configuration of modules, but is
 *  currently unused other than for documentation purposes.
 */
MODULE_SUPPORTED_DEVICE("testdevice"); |
中生成。 一旦您在内核树中获得了这样的标签文件,您就可以将光标放在某个函数调用上,并使用一些组合键直接跳转到定义函数。
示例 2-6. hello-4.c2.6. 向模块传递命令行参数/模块可以接受命令行参数,但不能使用您可能习惯的argc
argv。要允许将参数传递给您的模块,请将将接受命令行参数值的变量声明为全局变量,然后使用module_param()宏(在
,但用于 init 变量而不是函数。。linux/moduleparam.h中定义)来设置机制。 在运行时,insmod 将使用给定的任何命令行参数填充变量,例如 ./insmod mymodule.ko myvariable=5。 为了清晰起见,变量声明和宏应放在模块的开头。 示例代码应该可以消除我不得不承认糟糕的解释。和宏接受 3 个参数:变量的名称、其类型以及 sysfs 中相应文件的权限。 整数类型可以像往常一样有符号或无符号。 如果您想使用整数或字符串数组,请参阅.
int myint = 3; module_param(myint, int, 0); |
module_param_array()
int myintarray[2]; module_param_array(myintarray, int, NULL, 0); /* not interested in count */ int myshortarray[4]; int count; module_parm_array(myshortarray, short, , 0); /* put count into "count" variable */ |
module_param_string()
也支持数组,但现在的情况与 2.4 时代略有不同。 要跟踪参数的数量,您需要将指向计数变量的指针作为第三个参数传递。 您也可以选择忽略计数并传递 NULL 代替。 我们在这里展示了两种可能性一个好的用途是设置模块变量的默认值,例如端口或 IO 地址。 如果变量包含默认值,则执行自动检测(在其他地方解释)。 否则,保持当前值。 这将在稍后明确说明。最后,有一个宏函数
MODULE_PARM_DESC()
/*
 *  hello-5.c - Demonstrates command line argument passing to a module.
 */
#include <linux/module.h>
#include <linux/moduleparam.h>
#include <linux/kernel.h>
#include <linux/init.h>
#include <linux/stat.h>

MODULE_LICENSE("GPL");
MODULE_AUTHOR("Peter Jay Salzman");

static short int myshort = 1;
static int myint = 420;
static long int mylong = 9999;
static char *mystring = "blah";
static int myintArray[2] = { -1, -1 };
static int arr_argc = 0;

/*
 * module_param(foo, int, 0000)
 * The first param is the parameters name
 * The second param is it's data type
 * The final argument is the permissions bits,
 * for exposing parameters in sysfs (if non-zero) at a later stage.
 */

module_param(myshort, short, S_IRUSR | S_IWUSR | S_IRGRP | S_IWGRP);
MODULE_PARM_DESC(myshort, "A short integer");
module_param(myint, int, S_IRUSR | S_IWUSR | S_IRGRP | S_IROTH);
MODULE_PARM_DESC(myint, "An integer");
module_param(mylong, long, S_IRUSR);
MODULE_PARM_DESC(mylong, "A long integer");
module_param(mystring, charp, 0000);
MODULE_PARM_DESC(mystring, "A character string");

/*
 * module_param_array(name, type, num, perm);
 * The first param is the parameter's (in this case the array's) name
 * The second param is the data type of the elements of the array
 * The third argument is a pointer to the variable that will store the number
 * of elements of the array initialized by the user at module loading time
 * The fourth argument is the permission bits
 */
module_param_array(myintArray, int, &arr_argc, 0000);
MODULE_PARM_DESC(myintArray, "An array of integers");

static int __init hello_5_init(void)
{
	int i;
	printk(KERN_INFO "Hello, world 5\n=============\n");
	printk(KERN_INFO "myshort is a short integer: %hd\n", myshort);
	printk(KERN_INFO "myint is an integer: %d\n", myint);
	printk(KERN_INFO "mylong is a long integer: %ld\n", mylong);
	printk(KERN_INFO "mystring is a string: %s\n", mystring);
	for (i = 0; i < (sizeof myintArray / sizeof (int)); i++)
	{
		printk(KERN_INFO "myintArray[%d] = %d\n", i, myintArray[i]);
	}
	printk(KERN_INFO "got %d arguments for myintArray.\n", arr_argc);
	return 0;
}

static void __exit hello_5_exit(void)
{
	printk(KERN_INFO "Goodbye, world 5\n");
}

module_init(hello_5_init);
module_exit(hello_5_exit); |
,用于记录模块可以接受的参数。 它接受两个参数:变量名和描述该变量的自由格式字符串。
satan# insmod hello-5.ko mystring="bebop" mybyte=255 myintArray=-1 mybyte is an 8 bit integer: 255 myshort is a short integer: 1 myint is an integer: 20 mylong is a long integer: 9999 mystring is a string: bebop myintArray is -1 and 420 satan# rmmod hello-5 Goodbye, world 5 satan# insmod hello-5.ko mystring="supercalifragilisticexpialidocious" \ > mybyte=256 myintArray=-1,-1 mybyte is an 8 bit integer: 0 myshort is a short integer: 1 myint is an integer: 20 mylong is a long integer: 9999 mystring is a string: supercalifragilisticexpialidocious myintArray is -1 and -1 satan# rmmod hello-5 Goodbye, world 5 satan# insmod hello-5.ko mylong=hello hello-5.o: invalid argument syntax for mylong: 'h' |
示例 2-7. hello-5.c
我建议试用一下这段代码
有时将内核模块划分为几个源文件是有意义的。
/*
 *  start.c - Illustration of multi filed modules
 */

#include <linux/kernel.h>	/* We're doing kernel work */
#include <linux/module.h>	/* Specifically, a module */

int init_module(void)
{
	printk(KERN_INFO "Hello, world - this is the kernel speaking\n");
	return 0;
} |
这是一个此类内核模块的示例。
示例 2-8. start.c
/*
 *  stop.c - Illustration of multi filed modules
 */

#include <linux/kernel.h>	/* We're doing kernel work */
#include <linux/module.h>	/* Specifically, a module  */

void cleanup_module()
{
	printk(KERN_INFO "Short is the life of a kernel module\n");
} |
下一个文件
示例 2-9. stop.c
obj-m += hello-1.o obj-m += hello-2.o obj-m += hello-3.o obj-m += hello-4.o obj-m += hello-5.o obj-m += startstop.o startstop-objs := start.o stop.o all: make -C /lib/modules/$(shell uname -r)/build M=$(PWD) modules clean: make -C /lib/modules/$(shell uname -r)/build M=$(PWD) clean |
最后,makefile
示例 2-10. Makefile
这是到目前为止我们看到的所有示例的完整 makefile。 前五行没有什么特别之处,但是对于最后一个示例,我们将需要两行。 首先,我们为组合模块发明一个对象名称,其次,我们告诉 make 哪些对象文件是该模块的一部分。2.8. 为预编译内核构建模块显然,我们强烈建议您重新编译内核,以便您可以启用许多有用的调试功能,例如强制模块卸载 (
MODULE_FORCE_UNLOAD
):启用此选项后,即使内核认为不安全,您也可以通过 rmmod -f module 命令强制内核卸载模块。 此选项可以为您节省大量时间和模块开发期间的多次重启。
insmod: error inserting 'poet_atkm.ko': -1 Invalid module format |
但是,在许多情况下,您可能希望将模块加载到预编译的正在运行的内核中,例如常见的 Linux 发行版附带的内核,或者您过去编译的内核。 在某些情况下,您可能需要编译模块并将其插入到您不允许重新编译的正在运行的内核中,或者在您不希望重新启动的机器上。 如果您想不出一个会迫使您为预编译内核使用模块的案例,您可能想跳过此部分,并将本章的其余部分视为一个大的脚注。/var/log/messages:
Jun 4 22:07:54 localhost kernel: poet_atkm: version magic '2.6.5-1.358custom 686 REGPARM 4KSTACKS gcc-3.3' should be '2.6.5-1.358 686 REGPARM 4KSTACKS gcc-3.3' |
现在,如果您只是安装内核源代码树,使用它来编译您的内核模块,并且您尝试将您的模块插入内核,在大多数情况下,您会得到如下错误不太神秘的信息记录在中。 换句话说,您的内核拒绝接受您的模块,因为版本字符串(更准确地说,版本魔术)不匹配。 顺便说一句,版本魔术以静态字符串的形式存储在模块对象中,以vermagic开头。 版本数据在模块与
[root@pcsenonsrv 02-HelloWorld]# modinfo hello-4.ko license: GPL author: Peter Jay Salzman <p@dirac.org> description: A sample driver vermagic: 2.6.5-1.358 686 REGPARM 4KSTACKS gcc-3.3 depends: |
init/vermagic.o
文件链接时插入到您的模块中。 要检查版本魔术和存储在给定模块中的其他字符串,请发出 modinfo module.ko 命令为了克服这个问题,我们可以求助于 --force-vermagic 选项,但是此解决方案可能不安全,并且在生产模块中绝对不可接受。 因此,我们希望在与预编译内核构建环境相同的环境中编译我们的模块。 如何做到这一点,是本章其余部分的主题。首先,确保内核源代码树可用,其版本与您当前的内核完全相同。 然后,找到用于编译预编译内核的配置文件。 通常,这在您当前的/boot目录中可用,名称类似于
config-2.6.x自定义如果模块的版本魔数中出现的字符串与内核中的不符,这通常是由于某些发行版包含的 makefile 中对原始版本进行了修改。然后,检查您的/usr/src/linux/Makefile,并确保指定的版本信息与您当前内核使用的版本信息完全匹配。例如,您的 makefile 可能如下所示开始
VERSION = 2 PATCHLEVEL = 6 SUBLEVEL = 5 EXTRAVERSION = -1.358custom ... |
在这种情况下,您需要将符号的值恢复为EXTRAVERSION为-1.358。我们建议保留用于编译内核的 makefile 备份副本,该副本应位于/lib/modules/2.6.5-1.358/build。一个简单的 cp /lib/modules/`uname -r`/build/Makefile /usr/src/linux-`uname -r` 命令应该足够了。此外,如果您已经使用之前的(错误的)Makefile开始了内核构建,您还应该重新运行 make,或者直接修改符号UTS_RELEASE在文件/usr/src/linux-2.6.x/include/linux/version.h中,根据文件/lib/modules/2.6.x/build/include/linux/version.h的内容,或者用后者覆盖前者。
现在,请运行 make 以更新配置和版本头文件以及对象
[root@pcsenonsrv linux-2.6.x]# make CHK include/linux/version.h UPD include/linux/version.h SYMLINK include/asm -> include/asm-i386 SPLIT include/linux/autoconf.h -> include/config/* HOSTCC scripts/basic/fixdep HOSTCC scripts/basic/split-include HOSTCC scripts/basic/docproc HOSTCC scripts/conmakehash HOSTCC scripts/kallsyms CC scripts/empty.o ... |
如果您不想实际编译内核,您可以在 CTRL-C 之后立即中断构建过程,刚好在SPLIT行之后,因为那时您需要的文件将已准备就绪。现在您可以返回到模块的目录并编译它:它将完全根据您当前的内核设置构建,并且可以无错误地加载到内核中。
第 3 章. 预备知识
3.1. 模块与程序
3.1.1. 模块如何开始和结束
程序通常以main()函数开始,执行一系列指令,并在这些指令完成时终止。内核模块的工作方式略有不同。模块总是以init_module或您使用module_init调用的函数开始。这是模块的入口函数;它告诉内核模块提供的功能,并设置内核以在需要时运行模块的函数。一旦完成此操作,入口函数返回,模块将不执行任何操作,直到内核想要对模块提供的代码执行某些操作。
所有模块都通过调用cleanup_module或您使用module_exit调用的函数结束。这是模块的退出函数;它撤消入口函数所做的任何操作。它注销入口函数注册的功能。
每个模块都必须有一个入口函数和一个退出函数。由于指定入口和退出函数的方法不止一种,我将尽力使用术语“入口函数”和“退出函数”,但如果我疏忽而简单地将它们称为init_module和cleanup_module,我想您会明白我的意思。
3.1.2. 模块可用的函数
程序员经常使用他们未定义的函数。一个主要的例子是printf()。您使用这些库函数,这些函数由标准 C 库 libc 提供。这些函数的定义在链接阶段之前实际上不会进入您的程序,这确保了代码(例如printf())可用,并修复了指向该代码的调用指令。
内核模块在这里也不同。在 hello world 示例中,您可能已经注意到我们使用了函数printk(),但没有包含标准 I/O 库。这是因为模块是对象文件,其符号在 insmod 时被解析。符号的定义来自内核本身;您可以使用的唯一外部函数是内核提供的函数。如果您对内核导出了哪些符号感到好奇,请查看/proc/kallsyms.
需要记住的一点是库函数和系统调用之间的区别。库函数是更高级别的,完全在用户空间中运行,并为程序员提供了更方便的接口来访问执行实际工作的函数---系统调用。系统调用代表用户在内核模式下运行,并由内核本身提供。库函数printf()看起来可能是一个非常通用的打印函数,但它真正做的只是将数据格式化为字符串,并使用底层系统调用write()写入字符串数据,然后将数据发送到标准输出。
您想看看printf()发出了哪些系统调用吗?这很容易!编译以下程序
#include <stdio.h>
int main(void)
{ printf("hello"); return 0; }
|
使用 gcc -Wall -o hello hello.c。使用 strace ./hello 运行可执行文件。您印象深刻吗?您看到的每一行都对应一个系统调用。strace[4] 是一个方便的程序,可为您提供有关程序正在发出的系统调用的详细信息,包括发出了哪个调用,它的参数是什么以及它返回什么。它是找出程序尝试访问哪些文件等问题的宝贵工具。在末尾,您会看到一行看起来像write(1, "hello", 5hello)。就在那里。面具背后的printf()面孔。您可能不熟悉 write,因为大多数人使用库函数进行文件 I/O(例如 fopen、fputs、fclose)。如果是这种情况,请尝试查看 man 2 write。第 2 个 man 手册部分专门介绍系统调用(例如kill()和read()。第 3 个 man 手册部分专门介绍库调用,您可能更熟悉(例如cosh()和random()).
您甚至可以编写模块来替换内核的系统调用,我们稍后将这样做。黑客经常利用这类东西来制作后门或木马,但您可以编写自己的模块来做更良性的事情,例如让内核在有人尝试删除您系统上的文件时写入Tee hee, that tickles!。
3.1.3. 用户空间与内核空间
内核完全是关于资源访问的,无论所讨论的资源是显卡、硬盘驱动器甚至是内存。程序经常争夺相同的资源。正如我刚刚保存此文档一样,updatedb 开始更新 locate 数据库。我的 vim 会话和 updatedb 都在并发使用硬盘驱动器。内核需要保持事物井然有序,而不是在用户想访问资源时就给予他们访问权限。为此,CPU 可以在不同的模式下运行。每种模式都为在系统上执行您想要的操作提供了不同程度的自由。Intel 80386 架构有 4 种这样的模式,称为环。Unix 仅使用两个环;最高的环(环 0,也称为“超级用户模式”,其中允许发生任何事情)和最低的环,称为“用户模式”。
回想一下关于库函数与系统调用的讨论。通常,您在用户模式下使用库函数。库函数调用一个或多个系统调用,这些系统调用代表库函数执行,但在超级用户模式下执行,因为它们是内核本身的一部分。一旦系统调用完成其任务,它就会返回,执行权将转移回用户模式。
3.1.4. 命名空间
当您编写一个小的 C 程序时,您使用的变量既方便又有意义,读者容易理解。另一方面,如果您正在编写将成为更大问题一部分的例程,那么您拥有的任何全局变量都是其他人全局变量社区的一部分;某些变量名称可能会冲突。当程序有大量全局变量,但这些变量不够有意义以至于无法区分时,您会遇到命名空间污染。在大型项目中,必须努力记住保留名称,并找到开发命名唯一变量名称和符号的方案的方法。
在编写内核代码时,即使是最小的模块也会与整个内核链接,因此这绝对是一个问题。处理此问题的最佳方法是将所有变量声明为 static,并为您的符号使用明确定义的前缀。按照惯例,所有内核前缀都是小写的。如果您不想将所有内容声明为 static,另一种选择是声明一个符号表并将其注册到内核。我们稍后会讲到这一点。
文件/proc/kallsyms保存内核知道的所有符号,因此您的模块可以访问这些符号,因为它们共享内核的代码空间。
3.1.5. 代码空间
内存管理是一个非常复杂的主题---O'Reilly 的《深入理解 Linux 内核》的大部分内容都在讲内存管理!我们不打算成为内存管理方面的专家,但我们确实需要了解一些事实,才能开始担心编写真正的模块。
如果您没有考虑过段错误真正意味着什么,您可能会惊讶地听到指针实际上并不指向内存位置。无论如何,不是真正的内存位置。当创建一个进程时,内核会留出一部分真实的物理内存,并将其交给进程用于其执行代码、变量、堆栈、堆以及计算机科学家会知道的其他内容[5]。此内存从 0x00000000 开始,并扩展到它需要的任何大小。由于任何两个进程的内存空间都不重叠,因此每个可以访问内存地址的进程,例如0xbffff978,都将访问真实物理内存中的不同位置!这些进程将访问名为0xbffff978的索引,该索引指向为该特定进程预留的内存区域中的某种偏移量。在大多数情况下,像我们的 Hello, World 程序这样的进程无法访问另一个进程的空间,尽管有些方法我们稍后会讨论。
内核也有自己的内存空间。由于模块是可以动态插入和删除到内核中的代码(而不是半自治对象),因此它共享内核的代码空间,而不是拥有自己的代码空间。因此,如果您的模块发生段错误,内核也会发生段错误。如果您由于差一错误而开始覆盖数据,那么您就是在践踏内核数据(或代码)。这比听起来更糟糕,所以请尽力小心。
顺便说一句,我想指出的是,以上讨论对于任何使用单内核[6]的操作系统都是正确的。有些东西称为微内核,它们的模块可以获得自己的代码空间。GNU Hurd 和 QNX Neutrino 是微内核的两个示例。
3.1.6. 设备驱动程序
模块的一个类别是设备驱动程序,它为硬件(如电视卡或串行端口)提供功能。在 unix 上,每个硬件都由位于/dev中的文件表示,称为设备文件,它提供了与硬件通信的手段。设备驱动程序代表用户程序提供通信。因此,es1370.o声卡设备驱动程序可能会将/dev/sound设备文件连接到 Ensoniq IS1370 声卡。像 mp3blaster 这样的用户空间程序可以使用/dev/sound,而无需知道安装了哪种声卡。
3.1.6.1. 主设备号和次设备号
让我们看看一些设备文件。以下是代表主 IDE 硬盘驱动器上第一、第二和第三个分区的设备文件
# ls -l /dev/hda[1-3] brw-rw---- 1 root disk 3, 1 Jul 5 2000 /dev/hda1 brw-rw---- 1 root disk 3, 2 Jul 5 2000 /dev/hda2 brw-rw---- 1 root disk 3, 3 Jul 5 2000 /dev/hda3 |
注意以逗号分隔的数字列吗?第一个数字称为设备的主设备号。第二个数字是次设备号。主设备号告诉您哪个驱动程序用于访问硬件。每个驱动程序都分配有一个唯一的主设备号;所有具有相同主设备号的设备文件都由同一个驱动程序控制。以上所有主设备号均为 3,因为它们都由同一个驱动程序控制。
次设备号由驱动程序用来区分它控制的各种硬件。回到上面的例子,虽然所有三个设备都由同一个驱动程序处理,但它们具有唯一的次设备号,因为驱动程序将它们视为不同的硬件。
设备分为两种类型:字符设备和块设备。区别在于块设备具有请求缓冲区,因此它们可以选择响应请求的最佳顺序。这在存储设备的情况下很重要,在存储设备中,读取或写入彼此靠近的扇区比读取或写入彼此远离的扇区更快。另一个区别是块设备只能以块的形式接受输入和返回输出(其大小可能因设备而异),而字符设备可以根据需要使用任意字节数。世界上大多数设备都是字符设备,因为它们不需要这种类型的缓冲,并且它们不使用固定的块大小运行。您可以通过查看 ls -l 输出中的第一个字符来判断设备文件是块设备还是字符设备。如果它是“b”,则它是块设备,如果它是“c”,则它是字符设备。您在上面看到的设备是块设备。以下是一些字符设备(串行端口)
crw-rw---- 1 root dial 4, 64 Feb 18 23:34 /dev/ttyS0 crw-r----- 1 root dial 4, 65 Nov 17 10:26 /dev/ttyS1 crw-rw---- 1 root dial 4, 66 Jul 5 2000 /dev/ttyS2 crw-rw---- 1 root dial 4, 67 Jul 5 2000 /dev/ttyS3 |
如果要查看已分配了哪些主设备号,可以查看/usr/src/linux/Documentation/devices.txt.
安装系统时,所有这些设备文件都是由 mknod 命令创建的。要创建一个名为“coffee”的新字符设备,其主设备号/次设备号为12和2,只需执行 mknod /dev/coffee c 12 2。您不必须将您的设备文件放入/dev,但这是按照惯例进行的。Linus 将他的设备文件放在/dev,您也应该这样做。但是,在创建用于测试目的的设备文件时,将其放在您编译内核模块的工作目录中可能是可以的。只需确保在完成设备驱动程序的编写后将其放在正确的位置即可。
我想最后提几点,这些点是从上面的讨论中隐含的,但我希望明确地指出它们,以防万一。当访问设备文件时,内核使用该文件的主设备号来确定应使用哪个驱动程序来处理访问。这意味着内核实际上不需要使用甚至不需要知道次设备号。驱动程序本身是唯一关心次设备号的东西。它使用次设备号来区分不同的硬件。
顺便说一句,当我说“硬件”时,我的意思比您可以握在手中的 PCI 卡更抽象。看看这两个设备文件
% ls -l /dev/fd0 /dev/fd0u1680 brwxrwxrwx 1 root floppy 2, 0 Jul 5 2000 /dev/fd0 brw-rw---- 1 root floppy 2, 44 Jul 5 2000 /dev/fd0u1680 |
现在您可以查看这两个设备文件,并立即知道它们是块设备,并且由相同的驱动程序处理(块主设备号2)。您甚至可能意识到这两个都代表您的软盘驱动器,即使您只有一个软盘驱动器。为什么要使用两个文件?一个代表具有1.44 MB 存储容量的软盘驱动器。另一个是相同的软盘驱动器,具有1.68 MB 的存储容量,对应于某些人所说的“超格式化”磁盘。它比标准格式化的软盘拥有更多数据。因此,这里有一个例子,其中两个具有不同次设备号的设备文件实际上代表相同的物理硬件。因此,请注意,我们讨论中的“硬件”一词可能意味着非常抽象的东西。
第 4 章. 字符设备文件
4.1. 字符设备驱动程序
4.1.1. file_operations 结构
file_operations 结构在linux/fs.h中定义,并保存指向驱动程序定义的函数的指针,这些函数对设备执行各种操作。结构的每个字段都对应于驱动程序定义的函数的地址,以处理请求的操作。
例如,每个字符驱动程序都需要定义一个从设备读取的函数。file_operations 结构保存着模块的函数的地址,该函数执行该操作。以下是内核的定义2.6.5:
struct file_operations {
	struct module *owner;
	 loff_t(*llseek) (struct file *, loff_t, int);
	 ssize_t(*read) (struct file *, char __user *, size_t, loff_t *);
	 ssize_t(*aio_read) (struct kiocb *, char __user *, size_t, loff_t);
	 ssize_t(*write) (struct file *, const char __user *, size_t, loff_t *);
	 ssize_t(*aio_write) (struct kiocb *, const char __user *, size_t,
			      loff_t);
	int (*readdir) (struct file *, void *, filldir_t);
	unsigned int (*poll) (struct file *, struct poll_table_struct *);
	int (*ioctl) (struct inode *, struct file *, unsigned int,
		      unsigned long);
	int (*mmap) (struct file *, struct vm_area_struct *);
	int (*open) (struct inode *, struct file *);
	int (*flush) (struct file *);
	int (*release) (struct inode *, struct file *);
	int (*fsync) (struct file *, struct dentry *, int datasync);
	int (*aio_fsync) (struct kiocb *, int datasync);
	int (*fasync) (int, struct file *, int);
	int (*lock) (struct file *, int, struct file_lock *);
	 ssize_t(*readv) (struct file *, const struct iovec *, unsigned long,
			  loff_t *);
	 ssize_t(*writev) (struct file *, const struct iovec *, unsigned long,
			   loff_t *);
	 ssize_t(*sendfile) (struct file *, loff_t *, size_t, read_actor_t,
			     void __user *);
	 ssize_t(*sendpage) (struct file *, struct page *, int, size_t,
			     loff_t *, int);
	unsigned long (*get_unmapped_area) (struct file *, unsigned long,
					    unsigned long, unsigned long,
					    unsigned long);
};
|
某些操作未由驱动程序实现。例如,处理显卡的驱动程序不需要从目录结构中读取。 file_operations 结构中的相应条目应设置为NULL.
有一个 gcc 扩展,可以更方便地分配给此结构。您将在现代驱动程序中看到它,并且可能会感到惊讶。这是分配给该结构的新方法
struct file_operations fops = {
	read: device_read,
	write: device_write,
	open: device_open,
	release: device_release
};
|
但是,也有一种 C99 方法可以分配给结构的元素,并且这绝对优于使用 GNU 扩展。作者在编写本文时使用的 gcc 版本2.95,支持新的 C99 语法。如果有人想要移植您的驱动程序,您应该使用此语法。这将有助于兼容性
struct file_operations fops = {
	.read = device_read,
	.write = device_write,
	.open = device_open,
	.release = device_release
};
|
含义很明确,您应该意识到,您未显式分配的结构的任何成员都将由 gcc 初始化为NULL。
包含指向用于实现 read、write、open、... 系统调用的函数的指针的 struct file_operations 实例通常命名为fops.
4.1.2. file 结构
每个设备在内核中都由 file 结构表示,该结构在linux/fs.h中定义。请注意,file 是内核级结构,永远不会出现在用户空间程序中。它与 FILE 不同,FILE 由 glibc 定义,永远不会出现在内核空间函数中。此外,它的名称有点误导性;它表示抽象的打开“文件”,而不是磁盘上的文件,磁盘上的文件由名为 inode 的结构表示。
一个struct file的实例通常命名为filp。您也会看到它被称为struct file file。抵制这种诱惑。
继续查看file的定义。您看到的大多数条目,例如struct dentry,设备驱动程序未使用,您可以忽略它们。这是因为驱动程序不直接填充file;它们仅使用file中包含的结构,这些结构在其他地方创建。
4.1.3. 注册设备
如前所述,字符设备通过设备文件访问,设备文件通常位于/dev[7]。主设备号告诉您哪个驱动程序处理哪个设备文件。次设备号仅由驱动程序本身使用,以区分它正在操作的设备,以防驱动程序处理多个设备。
向系统添加驱动程序意味着向内核注册它。这与在模块初始化期间为其分配主设备号是同义的。您可以使用register_chrdev函数来执行此操作,该函数由linux/fs.h.
int register_chrdev(unsigned int major, const char *name, struct file_operations *fops); |
定义,其中unsigned int major是您要请求的主设备号,const char *name是设备名称,它将显示在/proc/devices和中,struct file_operations *fops是指向驱动程序的file_operationsregister_chrdev表的指针。负返回值表示注册失败。请注意,我们没有将次设备号传递给
现在的问题是,如何在不劫持已使用的主设备号的情况下获得主设备号?最简单的方法是查看Documentation/devices.txt并选择一个未使用的。这样做是不好的,因为您永远无法确定您选择的号码是否会在以后分配。答案是您可以要求内核为您分配一个动态主设备号。
如果将主设备号 0 传递给register_chrdev,则返回值将是动态分配的主设备号。缺点是您无法提前创建设备文件,因为您不知道主设备号是什么。有几种方法可以做到这一点。首先,驱动程序本身可以打印新分配的号码,我们可以手动创建设备文件。其次,新注册的设备将在/proc/devices中有一个条目,我们可以手动创建设备文件,也可以编写一个 shell 脚本来读取文件并创建设备文件。第三种方法是我们可以让我们的驱动程序在成功注册后使用mknod系统调用创建设备文件,并在调用cleanup_module.
期间使用 rm。
我们不能允许在 root 感觉可以的时候就 rmmod 内核模块。如果设备文件被进程打开,然后我们删除内核模块,则使用该文件将导致调用到适当函数(read/write)过去所在的内存位置。如果幸运的话,那里没有加载其他代码,我们将收到一条难看的错误消息。如果不幸的话,另一个内核模块被加载到同一位置,这意味着跳转到内核中另一个函数的中间。这种情况的结果将无法预测,但它们不会非常积极。
通常,当您不想允许某事发生时,您会从应该执行该操作的函数返回一个错误代码(负数)。对于cleanup_module,这是不可能的,因为它是一个 void 函数。但是,有一个计数器可以跟踪有多少进程正在使用您的模块。您可以通过查看/proc/modules的第 3 个字段来查看它的值。如果此数字不为零,则rmmod将失败。请注意,您不必从cleanup_module内部检查计数器,因为系统调用sys_delete_module(在linux/module.c中定义)将为您执行检查。您不应直接使用此计数器,但在linux/module.h中定义了一些函数,可让您增加、减少和显示此计数器
try_module_get(THIS_MODULE):增加使用计数。
module_put(THIS_MODULE):减少使用计数。
保持计数器的准确性非常重要;如果您曾经丢失了正确的使用计数,您将永远无法卸载该模块;现在是重新启动的时候了,孩子们。这注定会在模块开发过程中迟早发生。
4.1.5. chardev.c
下一个代码示例创建了一个名为chardev的字符驱动程序。您可以cat其设备文件(或open使用程序打开文件),驱动程序会将设备文件被读取的次数放入文件中。我们不支持写入文件(例如 echo "hi" > /dev/hello),但会捕获这些尝试并告知用户该操作不受支持。如果您没有看到我们如何处理读入缓冲区的数据,请不要担心;我们没有对它做太多处理。我们只是读入数据并打印一条消息,确认我们收到了数据。
示例 4-1. chardev.c
/*
 *  chardev.c: Creates a read-only char device that says how many times
 *  you've read from the dev file
 */

#include <linux/kernel.h>
#include <linux/module.h>
#include <linux/fs.h>
#include <asm/uaccess.h>	/* for put_user */

/*
 *  Prototypes - this would normally go in a .h file
 */
int init_module(void);
void cleanup_module(void);
static int device_open(struct inode *, struct file *);
static int device_release(struct inode *, struct file *);
static ssize_t device_read(struct file *, char *, size_t, loff_t *);
static ssize_t device_write(struct file *, const char *, size_t, loff_t *);

#define SUCCESS 0
#define DEVICE_NAME "chardev"	/* Dev name as it appears in /proc/devices   */
#define BUF_LEN 80		/* Max length of the message from the device */

/*
 * Global variables are declared as static, so are global within the file.
 */

static int Major;		/* Major number assigned to our device driver */
static int Device_Open = 0;	/* Is device open?
				 * Used to prevent multiple access to device */
static char msg[BUF_LEN];	/* The msg the device will give when asked */
static char *msg_Ptr;

static struct file_operations fops = {
	.read = device_read,
	.write = device_write,
	.open = device_open,
	.release = device_release
};

/*
 * This function is called when the module is loaded
 */
int init_module(void)
{
        Major = register_chrdev(0, DEVICE_NAME, &fops);

	if (Major < 0) {
	  printk(KERN_ALERT "Registering char device failed with %d\n", Major);
	  return Major;
	}

	printk(KERN_INFO "I was assigned major number %d. To talk to\n", Major);
	printk(KERN_INFO "the driver, create a dev file with\n");
	printk(KERN_INFO "'mknod /dev/%s c %d 0'.\n", DEVICE_NAME, Major);
	printk(KERN_INFO "Try various minor numbers. Try to cat and echo to\n");
	printk(KERN_INFO "the device file.\n");
	printk(KERN_INFO "Remove the device file and module when done.\n");

	return SUCCESS;
}

/*
 * This function is called when the module is unloaded
 */
void cleanup_module(void)
{
	/*
	 * Unregister the device
	 */
	int ret = unregister_chrdev(Major, DEVICE_NAME);
	if (ret < 0)
		printk(KERN_ALERT "Error in unregister_chrdev: %d\n", ret);
}

/*
 * Methods
 */

/*
 * Called when a process tries to open the device file, like
 * "cat /dev/mycharfile"
 */
static int device_open(struct inode *inode, struct file *file)
{
	static int counter = 0;

	if (Device_Open)
		return -EBUSY;

	Device_Open++;
	sprintf(msg, "I already told you %d times Hello world!\n", counter++);
	msg_Ptr = msg;
	try_module_get(THIS_MODULE);

	return SUCCESS;
}

/*
 * Called when a process closes the device file.
 */
static int device_release(struct inode *inode, struct file *file)
{
	Device_Open--;		/* We're now ready for our next caller */

	/*
	 * Decrement the usage count, or else once you opened the file, you'll
	 * never get get rid of the module.
	 */
	module_put(THIS_MODULE);

	return 0;
}

/*
 * Called when a process, which already opened the dev file, attempts to
 * read from it.
 */
static ssize_t device_read(struct file *filp,	/* see include/linux/fs.h   */
			   char *buffer,	/* buffer to fill with data */
			   size_t length,	/* length of the buffer     */
			   loff_t * offset)
{
	/*
	 * Number of bytes actually written to the buffer
	 */
	int bytes_read = 0;

	/*
	 * If we're at the end of the message,
	 * return 0 signifying end of file
	 */
	if (*msg_Ptr == 0)
		return 0;

	/*
	 * Actually put the data into the buffer
	 */
	while (length && *msg_Ptr) {

		/*
		 * The buffer is in the user data segment, not the kernel
		 * segment so "*" assignment won't work.  We have to use
		 * put_user which copies data from the kernel data segment to
		 * the user data segment.
		 */
		put_user(*(msg_Ptr++), buffer++);

		length--;
		bytes_read++;
	}

	/*
	 * Most read functions return the number of bytes put into the buffer
	 */
	return bytes_read;
}

/*
 * Called when a process writes to dev file: echo "hi" > /dev/hello
 */
static ssize_t
device_write(struct file *filp, const char *buff, size_t len, loff_t * off)
{
	printk(KERN_ALERT "Sorry, this operation isn't supported.\n");
	return -EINVAL;
} |
4.1.6. 为多个内核版本编写模块
系统调用是内核向进程显示的主要接口,通常在不同版本之间保持不变。可能会添加新的系统调用,但通常旧的系统调用会像以前一样运行。这对于向后兼容性是必要的——新的内核版本不应该破坏常规进程。在大多数情况下,设备文件也将保持不变。另一方面,内核内部接口可能会在不同版本之间发生变化,并且确实会发生变化。
Linux 内核版本分为稳定版本(n.$<偶数$>$.m)和开发版本(n.$<奇数$>$.m)。开发版本包括所有很酷的新想法,包括那些将被认为是错误的想法,或者在下一个版本中重新实现的想法。因此,您不能相信在这些版本中接口会保持不变(这就是为什么我不费心在这本书中支持它们的原因,这太费劲了,而且很快就会过时)。另一方面,在稳定版本中,我们可以预期接口保持不变,而与错误修复版本(m 号)无关。
不同的内核版本之间存在差异,如果您想支持多个内核版本,您会发现自己必须编写条件编译指令。执行此操作的方法是将宏LINUX_VERSION_CODE与宏KERNEL_VERSION进行比较。在内核的a.b.c版本中,此宏的值将为 $2^{16}a+2^{8}b+c$。
虽然本指南的先前版本详细介绍了如何使用此类构造编写向后兼容的代码,但我们决定打破这一传统,以便做得更好。有兴趣这样做的人现在可以使用与他们的内核版本匹配的 LKMPG。我们决定像内核一样对 LKMPG 进行版本控制,至少在主版本号和次版本号方面是这样。我们使用补丁级别进行我们自己的版本控制,因此对于内核 2.4.x 使用 LKMPG 版本 2.4.x,对于内核 2.6.x 使用 LKMPG 版本 2.6.x,依此类推。另请确保您始终使用内核和指南的当前最新版本。
更新:我们上面所说的对于内核 2.6.10 及更早版本是正确的。您可能已经注意到,最近的内核看起来有所不同。如果您还没有注意到,它们现在看起来像 2.6.x.y。前三项的含义基本保持不变,但添加了一个子补丁级别,它将指示安全修复程序,直到下一个稳定补丁级别发布。因此,人们可以在具有安全更新的稳定树和使用最新的内核作为开发人员树之间进行选择。如果您对完整的故事感兴趣,请搜索内核邮件列表存档。
第 5 章. /proc 文件系统
5.1. /proc 文件系统
在 Linux 中,内核和内核模块还有另一种向进程发送信息的机制---/proc文件系统。最初设计用于轻松访问有关进程的信息(因此得名),现在内核的每一部分都使用它来报告一些有趣的信息,例如/proc/modules,它提供模块列表,以及/proc/meminfo,它统计内存使用情况统计信息。
使用 proc 文件系统的方法与设备驱动程序中使用的方法非常相似---创建一个结构,其中包含/proc文件所需的所有信息,包括指向任何处理函数(在我们的例子中只有一个,即当有人尝试从/proc文件读取时调用的函数)的指针。然后,init_module向内核注册该结构,并cleanup_module注销它。
我们使用proc_register_dynamic[8] 的原因是因为我们不想提前确定用于文件的 inode 编号,而是允许内核确定它以防止冲突。普通文件系统位于磁盘上,而不是仅在内存中(/proc是这种情况),在这种情况下,inode 编号是指向磁盘位置的指针,文件的索引节点(简称 inode)位于该位置。inode 包含有关文件的信息,例如文件权限,以及指向可以找到文件数据的磁盘位置的指针。
因为在文件打开或关闭时我们不会被调用,所以我们无处可放try_module_get和try_module_put在此模块中,如果文件被打开,然后模块被删除,则无法避免后果。
这是一个简单的示例,展示了如何使用 /proc 文件。这是 /proc 文件系统的 HelloWorld。它分为三个部分:在函数/proc/helloworld中创建文件init_module,当在回调函数/proc/helloworld中读取文件时返回一个值(和一个缓冲区)procfs_read,并在模块加载时使用函数/proc/helloworld中创建文件cleanup_module.
,但用于 init 变量而不是函数。/proc/helloworld创建文件删除文件create_proc_entry。返回值是一个“struct proc_dir_entry *”,它将用于配置文件/proc/helloworld(例如,此文件的所有者)。空返回值表示创建失败。
每次,每次读取/proc/helloworld文件时,都会调用函数文件时返回一个值(和一个缓冲区)procfs_read。此函数的两个参数非常重要:缓冲区(第一个参数)和偏移量(第三个参数)。缓冲区的内容将返回给读取它的应用程序(例如 cat 命令)。偏移量是文件中的当前位置。如果函数的返回值不为空,则再次调用此函数。因此,请小心使用此函数,如果它永远不返回零,则会无限期地调用读取函数。
% cat /proc/helloworld
HelloWorld!
|
示例 5-1. procfs1.c
/*
 *  procfs1.c -  create a "file" in /proc
 *
 */

#include <linux/module.h>	/* Specifically, a module */
#include <linux/kernel.h>	/* We're doing kernel work */
#include <linux/proc_fs.h>	/* Necessary because we use the proc fs */

#define procfs_name "helloworld"

/**
 * This structure hold information about the /proc file
 *
 */
struct proc_dir_entry *Our_Proc_File;

/* Put data into the proc fs file.
 *
 * Arguments
 * =========
 * 1. The buffer where the data is to be inserted, if
 *    you decide to use it.
 * 2. A pointer to a pointer to characters. This is
 *    useful if you don't want to use the buffer
 *    allocated by the kernel.
 * 3. The current position in the file
 * 4. The size of the buffer in the first argument.
 * 5. Write a "1" here to indicate EOF.
 * 6. A pointer to data (useful in case one common
 *    read for multiple /proc/... entries)
 *
 * Usage and Return Value
 * ======================
 * A return value of zero means you have no further
 * information at this time (end of file). A negative
 * return value is an error condition.
 *
 * For More Information
 * ====================
 * The way I discovered what to do with this function
 * wasn't by reading documentation, but by reading the
 * code which used it. I just looked to see what uses
 * the get_info field of proc_dir_entry struct (I used a
 * combination of find and grep, if you're interested),
 * and I saw that  it is used in <kernel source
 * directory>/fs/proc/array.c.
 *
 * If something is unknown about the kernel, this is
 * usually the way to go. In Linux we have the great
 * advantage of having the kernel source code for
 * free - use it.
 */
int
procfile_read(char *buffer,
	      char **buffer_location,
	      off_t offset, int buffer_length, int *eof, void *data)
{
	int ret;

	printk(KERN_INFO "procfile_read (/proc/%s) called\n", procfs_name);

	/*
	 * We give all of our information in one go, so if the
	 * user asks us if we have more information the
	 * answer should always be no.
	 *
	 * This is important because the standard read
	 * function from the library would continue to issue
	 * the read system call until the kernel replies
	 * that it has no more information, or until its
	 * buffer is filled.
	 */
	if (offset > 0) {
		/* we have finished to read, return 0 */
		ret  = 0;
	} else {
		/* fill the buffer, return the buffer size */
		ret = sprintf(buffer, "HelloWorld!\n");
	}

	return ret;
}

int init_module()
{
	Our_Proc_File = create_proc_entry(procfs_name, 0644, NULL);

	if (Our_Proc_File == NULL) {
		remove_proc_entry(procfs_name, &proc_root);
		printk(KERN_ALERT "Error: Could not initialize /proc/%s\n",
		       procfs_name);
		return -ENOMEM;
	}

	Our_Proc_File->read_proc = procfile_read;
	Our_Proc_File->owner 	 = THIS_MODULE;
	Our_Proc_File->mode 	 = S_IFREG | S_IRUGO;
	Our_Proc_File->uid 	 = 0;
	Our_Proc_File->gid 	 = 0;
	Our_Proc_File->size 	 = 37;

	printk(KERN_INFO "/proc/%s created\n", procfs_name);
	return 0;	/* everything is ok */
}

void cleanup_module()
{
	remove_proc_entry(procfs_name, &proc_root);
	printk(KERN_INFO "/proc/%s removed\n", procfs_name);
} |
5.2. 读取和写入 /proc 文件
我们已经看到了一个非常简单的 /proc 文件示例,我们在其中仅读取了/proc/helloworld文件。也可以写入 /proc 文件。它的工作方式与读取相同,当写入 /proc 文件时,会调用一个函数。但是,读取存在一些差异,数据来自用户,因此您必须将数据从用户空间导入到内核空间(使用copy_from_user或get_user)
的原因是copy_from_user或get_userLinux 内存(在 Intel 架构上,在其他一些处理器上可能有所不同)是分段的。这意味着指针本身并不引用内存中的唯一位置,而仅引用内存段中的位置,您需要知道它是哪个内存段才能使用它。内核有一个内存段,每个进程都有一个内存段。
进程可以访问的唯一内存段是它自己的内存段,因此在编写作为进程运行的常规程序时,无需担心段。当您编写内核模块时,通常您想要访问内核内存段,系统会自动处理该段。但是,当需要在当前运行的进程和内核之间传递内存缓冲区的内容时,内核函数会收到指向进程段中内存缓冲区的指针。put_user和get_user宏允许您访问该内存。这些函数仅处理一个字符,您可以使用copy_to_user和copy_from_user处理多个字符。由于缓冲区(在读取或写入函数中)位于内核空间中,因此对于写入函数,您需要导入数据,因为它来自用户空间,但对于读取函数则不需要,因为数据已位于内核空间中。
示例 5-2. procfs2.c
/**
 *  procfs2.c -  create a "file" in /proc
 *
 */

#include <linux/module.h>	/* Specifically, a module */
#include <linux/kernel.h>	/* We're doing kernel work */
#include <linux/proc_fs.h>	/* Necessary because we use the proc fs */
#include <asm/uaccess.h>	/* for copy_from_user */

#define PROCFS_MAX_SIZE		1024
#define PROCFS_NAME 		"buffer1k"

/**
 * This structure hold information about the /proc file
 *
 */
static struct proc_dir_entry *Our_Proc_File;

/**
 * The buffer used to store character for this module
 *
 */
static char procfs_buffer[PROCFS_MAX_SIZE];

/**
 * The size of the buffer
 *
 */
static unsigned long procfs_buffer_size = 0;

/**
 * This function is called then the /proc file is read
 *
 */
int
procfile_read(char *buffer,
	      char **buffer_location,
	      off_t offset, int buffer_length, int *eof, void *data)
{
	int ret;

	printk(KERN_INFO "procfile_read (/proc/%s) called\n", PROCFS_NAME);

	if (offset > 0) {
		/* we have finished to read, return 0 */
		ret  = 0;
	} else {
		/* fill the buffer, return the buffer size */
		memcpy(buffer, procfs_buffer, procfs_buffer_size);
		ret = procfs_buffer_size;
	}

	return ret;
}

/**
 * This function is called with the /proc file is written
 *
 */
int procfile_write(struct file *file, const char *buffer, unsigned long count,
		   void *data)
{
	/* get buffer size */
	procfs_buffer_size = count;
	if (procfs_buffer_size > PROCFS_MAX_SIZE ) {
		procfs_buffer_size = PROCFS_MAX_SIZE;
	}

	/* write data to the buffer */
	if ( copy_from_user(procfs_buffer, buffer, procfs_buffer_size) ) {
		return -EFAULT;
	}

	return procfs_buffer_size;
}

/**
 *This function is called when the module is loaded
 *
 */
int init_module()
{
	/* create the /proc file */
	Our_Proc_File = create_proc_entry(PROCFS_NAME, 0644, NULL);

	if (Our_Proc_File == NULL) {
		remove_proc_entry(PROCFS_NAME, &proc_root);
		printk(KERN_ALERT "Error: Could not initialize /proc/%s\n",
			PROCFS_NAME);
		return -ENOMEM;
	}

	Our_Proc_File->read_proc  = procfile_read;
	Our_Proc_File->write_proc = procfile_write;
	Our_Proc_File->owner 	  = THIS_MODULE;
	Our_Proc_File->mode 	  = S_IFREG | S_IRUGO;
	Our_Proc_File->uid 	  = 0;
	Our_Proc_File->gid 	  = 0;
	Our_Proc_File->size 	  = 37;

	printk(KERN_INFO "/proc/%s created\n", PROCFS_NAME);
	return 0;	/* everything is ok */
}

/**
 *This function is called when the module is unloaded
 *
 */
void cleanup_module()
{
	remove_proc_entry(PROCFS_NAME, &proc_root);
	printk(KERN_INFO "/proc/%s removed\n", PROCFS_NAME);
} |
5.3. 使用标准文件系统管理 /proc 文件
我们已经了解了如何使用 /proc 接口读取和写入 /proc 文件。但是也可以使用 inode 管理 /proc 文件。主要目的是使用高级功能,例如权限。
在 Linux 中,有一种用于文件系统注册的标准机制。由于每个文件系统都必须有自己的函数来处理 inode 和文件操作[9],因此有一个特殊的结构来保存指向所有这些函数的指针,struct inode_operations,其中包括指向struct file_operations的指针。在 /proc 中,每当我们注册一个新文件时,我们都可以指定将使用哪个struct inode_operations来访问它。这是我们使用的机制,一个struct inode_operations,其中包括指向struct file_operations的指针,后者又包括指向我们的文件时返回一个值(和一个缓冲区)procfs_read和procfs_write函数的指针。
这里的另一个有趣的点是module_permission函数。每当进程尝试对/proc文件执行某些操作时,都会调用此函数,它可以决定是否允许访问。目前,它仅基于操作和当前用户的 uid(如current,它是一个指向结构的指针,该结构包含有关当前运行进程的信息),但它可以基于我们喜欢的任何内容,例如其他进程正在对同一文件执行的操作、一天中的时间或我们收到的最后输入。
重要的是要注意,在内核中,读取和写入的标准角色是相反的。读取函数用于输出,而写入函数用于输入。原因在于读取和写入是指用户的角度 --- 如果进程从内核读取某些内容,则内核需要输出它;如果进程向内核写入某些内容,则内核将其作为输入接收。
示例 5-3. procfs3.c
/*
 *  procfs3.c -  create a "file" in /proc, use the file_operation way
 *  		to manage the file.
 */

#include <linux/kernel.h>	/* We're doing kernel work */
#include <linux/module.h>	/* Specifically, a module */
#include <linux/proc_fs.h>	/* Necessary because we use proc fs */
#include <asm/uaccess.h>	/* for copy_*_user */

#define PROC_ENTRY_FILENAME 	"buffer2k"
#define PROCFS_MAX_SIZE 	2048

/**
 * The buffer (2k) for this module
 *
 */
static char procfs_buffer[PROCFS_MAX_SIZE];

/**
 * The size of the data hold in the buffer
 *
 */
static unsigned long procfs_buffer_size = 0;

/**
 * The structure keeping information about the /proc file
 *
 */
static struct proc_dir_entry *Our_Proc_File;

/**
 * This funtion is called when the /proc file is read
 *
 */
static ssize_t procfs_read(struct file *filp,	/* see include/linux/fs.h   */
			     char *buffer,	/* buffer to fill with data */
			     size_t length,	/* length of the buffer     */
			     loff_t * offset)
{
	static int finished = 0;

	/*
	 * We return 0 to indicate end of file, that we have
	 * no more information. Otherwise, processes will
	 * continue to read from us in an endless loop.
	 */
	if ( finished ) {
		printk(KERN_INFO "procfs_read: END\n");
		finished = 0;
		return 0;
	}

	finished = 1;

	/*
	 * We use put_to_user to copy the string from the kernel's
	 * memory segment to the memory segment of the process
	 * that called us. get_from_user, BTW, is
	 * used for the reverse.
	 */
	if ( copy_to_user(buffer, procfs_buffer, procfs_buffer_size) ) {
		return -EFAULT;
	}

	printk(KERN_INFO "procfs_read: read %lu bytes\n", procfs_buffer_size);

	return procfs_buffer_size;	/* Return the number of bytes "read" */
}

/*
 * This function is called when /proc is written
 */
static ssize_t
procfs_write(struct file *file, const char *buffer, size_t len, loff_t * off)
{
	if ( len > PROCFS_MAX_SIZE )	{
		procfs_buffer_size = PROCFS_MAX_SIZE;
	}
	else	{
		procfs_buffer_size = len;
	}

	if ( copy_from_user(procfs_buffer, buffer, procfs_buffer_size) ) {
		return -EFAULT;
	}

	printk(KERN_INFO "procfs_write: write %lu bytes\n", procfs_buffer_size);

	return procfs_buffer_size;
}

/*
 * This function decides whether to allow an operation
 * (return zero) or not allow it (return a non-zero
 * which indicates why it is not allowed).
 *
 * The operation can be one of the following values:
 * 0 - Execute (run the "file" - meaningless in our case)
 * 2 - Write (input to the kernel module)
 * 4 - Read (output from the kernel module)
 *
 * This is the real function that checks file
 * permissions. The permissions returned by ls -l are
 * for referece only, and can be overridden here.
 */

static int module_permission(struct inode *inode, int op, struct nameidata *foo)
{
	/*
	 * We allow everybody to read from our module, but
	 * only root (uid 0) may write to it
	 */
	if (op == 4 || (op == 2 && current->euid == 0))
		return 0;

	/*
	 * If it's anything else, access is denied
	 */
	return -EACCES;
}

/*
 * The file is opened - we don't really care about
 * that, but it does mean we need to increment the
 * module's reference count.
 */
int procfs_open(struct inode *inode, struct file *file)
{
	try_module_get(THIS_MODULE);
	return 0;
}

/*
 * The file is closed - again, interesting only because
 * of the reference count.
 */
int procfs_close(struct inode *inode, struct file *file)
{
	module_put(THIS_MODULE);
	return 0;		/* success */
}

static struct file_operations File_Ops_4_Our_Proc_File = {
	.read 	 = procfs_read,
	.write 	 = procfs_write,
	.open 	 = procfs_open,
	.release = procfs_close,
};

/*
 * Inode operations for our proc file. We need it so
 * we'll have some place to specify the file operations
 * structure we want to use, and the function we use for
 * permissions. It's also possible to specify functions
 * to be called for anything else which could be done to
 * an inode (although we don't bother, we just put
 * NULL).
 */

static struct inode_operations Inode_Ops_4_Our_Proc_File = {
	.permission = module_permission,	/* check for permissions */
};

/*
 * Module initialization and cleanup
 */
int init_module()
{
	/* create the /proc file */
	Our_Proc_File = create_proc_entry(PROC_ENTRY_FILENAME, 0644, NULL);

	/* check if the /proc file was created successfuly */
	if (Our_Proc_File == NULL){
		printk(KERN_ALERT "Error: Could not initialize /proc/%s\n",
		       PROC_ENTRY_FILENAME);
		return -ENOMEM;
	}

	Our_Proc_File->owner = THIS_MODULE;
	Our_Proc_File->proc_iops = &Inode_Ops_4_Our_Proc_File;
	Our_Proc_File->proc_fops = &File_Ops_4_Our_Proc_File;
	Our_Proc_File->mode = S_IFREG | S_IRUGO | S_IWUSR;
	Our_Proc_File->uid = 0;
	Our_Proc_File->gid = 0;
	Our_Proc_File->size = 80;

	printk(KERN_INFO "/proc/%s created\n", PROC_ENTRY_FILENAME);

	return 0;	/* success */
}

void cleanup_module()
{
	remove_proc_entry(PROC_ENTRY_FILENAME, &proc_root);
	printk(KERN_INFO "/proc/%s removed\n", PROC_ENTRY_FILENAME);
} |
仍然渴望 procfs 示例吗?嗯,首先请记住,有传言称 procfs 即将退出,请考虑改用 sysfs。其次,如果您真的还不够,下面还有一个强烈推荐的 procfs 奖励关卡linux/Documentation/DocBook/。在您的顶级内核目录中使用 make help 获取有关如何将其转换为您喜欢的格式的说明。示例: make htmldocs 。如果您想自己记录一些与内核相关的内容,请考虑使用此机制。
5.4. 使用 seq_file 管理 /proc 文件
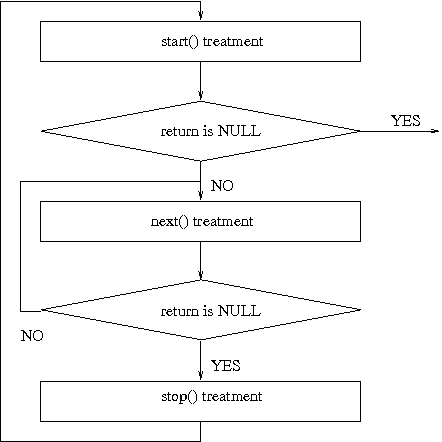
正如我们所见,编写 /proc 文件可能相当“复杂”。因此,为了帮助人们编写 /proc 文件,有一个名为 seq_file 的 API,它可以帮助格式化 /proc 文件以进行输出。它基于序列,序列由 3 个函数组成:start()、next() 和 stop()。当用户读取 /proc 文件时,seq_file API 启动一个序列。
序列以调用函数 start() 开始。如果返回值是非 NULL 值,则调用函数 next()。此函数是一个迭代器,目标是遍历所有数据。每次调用 next() 时,也会调用函数 show()。它将数据值写入用户读取的缓冲区。函数 next() 会被调用,直到它返回 NULL。当 next() 返回 NULL 时,序列结束,然后调用函数 stop()。
请注意:当一个序列完成时,另一个序列会开始。这意味着在函数 stop() 结束时,函数 start() 会再次被调用。当函数 start() 返回 NULL 时,此循环结束。您可以在“seq_file 工作原理”图中看到此方案。
Seq_file 为 file_operations 提供了基本函数,例如 seq_read、seq_lseek 和其他一些函数。但是没有用于写入 /proc 文件的函数。当然,您仍然可以使用与上一个示例相同的方式。
示例 5-4. procfs4.c
/**
 *  procfs4.c -  create a "file" in /proc
 * 	This program uses the seq_file library to manage the /proc file.
 *
 */

#include <linux/kernel.h>	/* We're doing kernel work */
#include <linux/module.h>	/* Specifically, a module */
#include <linux/proc_fs.h>	/* Necessary because we use proc fs */
#include <linux/seq_file.h>	/* for seq_file */

#define PROC_NAME	"iter"

MODULE_AUTHOR("Philippe Reynes");
MODULE_LICENSE("GPL");

/**
 * This function is called at the beginning of a sequence.
 * ie, when:
 *	- the /proc file is read (first time)
 *	- after the function stop (end of sequence)
 *
 */
static void *my_seq_start(struct seq_file *s, loff_t *pos)
{
	static unsigned long counter = 0;

	/* beginning a new sequence ? */
	if ( *pos == 0 )
	{
		/* yes => return a non null value to begin the sequence */
		return &counter;
	}
	else
	{
		/* no => it's the end of the sequence, return end to stop reading */
		*pos = 0;
		return NULL;
	}
}

/**
 * This function is called after the beginning of a sequence.
 * It's called untill the return is NULL (this ends the sequence).
 *
 */
static void *my_seq_next(struct seq_file *s, void *v, loff_t *pos)
{
	unsigned long *tmp_v = (unsigned long *)v;
	(*tmp_v)++;
	(*pos)++;
	return NULL;
}

/**
 * This function is called at the end of a sequence
 *
 */
static void my_seq_stop(struct seq_file *s, void *v)
{
	/* nothing to do, we use a static value in start() */
}

/**
 * This function is called for each "step" of a sequence
 *
 */
static int my_seq_show(struct seq_file *s, void *v)
{
	loff_t *spos = (loff_t *) v;

	seq_printf(s, "%Ld\n", *spos);
	return 0;
}

/**
 * This structure gather "function" to manage the sequence
 *
 */
static struct seq_operations my_seq_ops = {
	.start = my_seq_start,
	.next  = my_seq_next,
	.stop  = my_seq_stop,
	.show  = my_seq_show
};

/**
 * This function is called when the /proc file is open.
 *
 */
static int my_open(struct inode *inode, struct file *file)
{
	return seq_open(file, &my_seq_ops);
};

/**
 * This structure gather "function" that manage the /proc file
 *
 */
static struct file_operations my_file_ops = {
	.owner   = THIS_MODULE,
	.open    = my_open,
	.read    = seq_read,
	.llseek  = seq_lseek,
	.release = seq_release
};


/**
 * This function is called when the module is loaded
 *
 */
int init_module(void)
{
	struct proc_dir_entry *entry;

	entry = create_proc_entry(PROC_NAME, 0, NULL);
	if (entry) {
		entry->proc_fops = &my_file_ops;
	}

	return 0;
}

/**
 * This function is called when the module is unloaded.
 *
 */
void cleanup_module(void)
{
	remove_proc_entry(PROC_NAME, NULL);
} |
如果您想了解更多信息,可以阅读此网页
您也可以阅读 linux 内核中 fs/seq_file.c 的代码。
第 7 章. 与设备文件对话
7.1. 与设备文件对话(写入和 IOCTL)
设备文件应该代表物理设备。大多数物理设备既用于输出也用于输入,因此内核中的设备驱动程序必须具有某种机制来获取要从进程发送到设备的输出。这是通过打开设备文件进行输出并写入它来完成的,就像写入文件一样。在以下示例中,这是通过以下方式实现的device_write.
这并不总是足够。想象一下,您有一个连接到调制解调器的串行端口(即使您有一个内置调制解调器,从 CPU 的角度来看,它仍然被实现为连接到调制解调器的串行端口,因此您不必过度发挥想象力)。自然的做法是使用设备文件向调制解调器写入内容(调制解调器命令或要通过电话线发送的数据)并从调制解调器读取内容(命令的响应或通过电话线接收的数据)。但是,这留下了一个问题,当您需要与串行端口本身对话时该怎么办,例如发送数据发送和接收的速率。
在 Unix 中的答案是使用一个名为ioctl(Input Output ConTroL 的缩写)。每个设备都可以有自己的ioctl命令,可以是读取ioctl(用于从进程向内核发送信息),写入ioctl(用于向进程返回信息),[10] 两者都有或都没有。该ioctl函数被调用时带有三个参数:适当设备文件的文件描述符、ioctl 编号和一个参数,该参数的类型为 long,因此您可以使用强制转换来传递任何内容。[11]
ioctl 编号编码了主设备号、ioctl 的类型、命令和参数的类型。此 ioctl 编号通常由宏调用创建(_IO, _IOR, _IOW或_IOWR--- 取决于类型)在一个头文件中。然后,使用ioctl(以便它们可以生成适当的ioctl)以及内核模块(以便它可以理解它)。在下面的示例中,头文件是chardev.h而使用它的程序是ioctl.c.
如果您想使用ioctl在您自己的内核模块中,最好接收官方ioctl分配,这样如果您不小心获得了别人的ioctl,或者如果他们获得了您的,您就会知道出了问题。有关更多信息,请查阅内核源代码树,位于Documentation/ioctl-number.txt.
示例 7-1. chardev.c
/*
 *  chardev.c - Create an input/output character device
 */

#include <linux/kernel.h>	/* We're doing kernel work */
#include <linux/module.h>	/* Specifically, a module */
#include <linux/fs.h>
#include <asm/uaccess.h>	/* for get_user and put_user */

#include "chardev.h"
#define SUCCESS 0
#define DEVICE_NAME "char_dev"
#define BUF_LEN 80

/*
 * Is the device open right now? Used to prevent
 * concurent access into the same device
 */
static int Device_Open = 0;

/*
 * The message the device will give when asked
 */
static char Message[BUF_LEN];

/*
 * How far did the process reading the message get?
 * Useful if the message is larger than the size of the
 * buffer we get to fill in device_read.
 */
static char *Message_Ptr;

/*
 * This is called whenever a process attempts to open the device file
 */
static int device_open(struct inode *inode, struct file *file)
{
#ifdef DEBUG
	printk(KERN_INFO "device_open(%p)\n", file);
#endif

	/*
	 * We don't want to talk to two processes at the same time
	 */
	if (Device_Open)
		return -EBUSY;

	Device_Open++;
	/*
	 * Initialize the message
	 */
	Message_Ptr = Message;
	try_module_get(THIS_MODULE);
	return SUCCESS;
}

static int device_release(struct inode *inode, struct file *file)
{
#ifdef DEBUG
	printk(KERN_INFO "device_release(%p,%p)\n", inode, file);
#endif

	/*
	 * We're now ready for our next caller
	 */
	Device_Open--;

	module_put(THIS_MODULE);
	return SUCCESS;
}

/*
 * This function is called whenever a process which has already opened the
 * device file attempts to read from it.
 */
static ssize_t device_read(struct file *file,	/* see include/linux/fs.h   */
			   char __user * buffer,	/* buffer to be
							 * filled with data */
			   size_t length,	/* length of the buffer     */
			   loff_t * offset)
{
	/*
	 * Number of bytes actually written to the buffer
	 */
	int bytes_read = 0;

#ifdef DEBUG
	printk(KERN_INFO "device_read(%p,%p,%d)\n", file, buffer, length);
#endif

	/*
	 * If we're at the end of the message, return 0
	 * (which signifies end of file)
	 */
	if (*Message_Ptr == 0)
		return 0;

	/*
	 * Actually put the data into the buffer
	 */
	while (length && *Message_Ptr) {

		/*
		 * Because the buffer is in the user data segment,
		 * not the kernel data segment, assignment wouldn't
		 * work. Instead, we have to use put_user which
		 * copies data from the kernel data segment to the
		 * user data segment.
		 */
		put_user(*(Message_Ptr++), buffer++);
		length--;
		bytes_read++;
	}

#ifdef DEBUG
	printk(KERN_INFO "Read %d bytes, %d left\n", bytes_read, length);
#endif

	/*
	 * Read functions are supposed to return the number
	 * of bytes actually inserted into the buffer
	 */
	return bytes_read;
}

/*
 * This function is called when somebody tries to
 * write into our device file.
 */
static ssize_t
device_write(struct file *file,
	     const char __user * buffer, size_t length, loff_t * offset)
{
	int i;

#ifdef DEBUG
	printk(KERN_INFO "device_write(%p,%s,%d)", file, buffer, length);
#endif

	for (i = 0; i < length && i < BUF_LEN; i++)
		get_user(Message[i], buffer + i);

	Message_Ptr = Message;

	/*
	 * Again, return the number of input characters used
	 */
	return i;
}

/*
 * This function is called whenever a process tries to do an ioctl on our
 * device file. We get two extra parameters (additional to the inode and file
 * structures, which all device functions get): the number of the ioctl called
 * and the parameter given to the ioctl function.
 *
 * If the ioctl is write or read/write (meaning output is returned to the
 * calling process), the ioctl call returns the output of this function.
 *
 */
int device_ioctl(struct inode *inode,	/* see include/linux/fs.h */
		 struct file *file,	/* ditto */
		 unsigned int ioctl_num,	/* number and param for ioctl */
		 unsigned long ioctl_param)
{
	int i;
	char *temp;
	char ch;

	/*
	 * Switch according to the ioctl called
	 */
	switch (ioctl_num) {
	case IOCTL_SET_MSG:
		/*
		 * Receive a pointer to a message (in user space) and set that
		 * to be the device's message.  Get the parameter given to
		 * ioctl by the process.
		 */
		temp = (char *)ioctl_param;

		/*
		 * Find the length of the message
		 */
		get_user(ch, temp);
		for (i = 0; ch && i < BUF_LEN; i++, temp++)
			get_user(ch, temp);

		device_write(file, (char *)ioctl_param, i, 0);
		break;

	case IOCTL_GET_MSG:
		/*
		 * Give the current message to the calling process -
		 * the parameter we got is a pointer, fill it.
		 */
		i = device_read(file, (char *)ioctl_param, 99, 0);

		/*
		 * Put a zero at the end of the buffer, so it will be
		 * properly terminated
		 */
		put_user('\0', (char *)ioctl_param + i);
		break;

	case IOCTL_GET_NTH_BYTE:
		/*
		 * This ioctl is both input (ioctl_param) and
		 * output (the return value of this function)
		 */
		return Message[ioctl_param];
		break;
	}

	return SUCCESS;
}

/* Module Declarations */

/*
 * This structure will hold the functions to be called
 * when a process does something to the device we
 * created. Since a pointer to this structure is kept in
 * the devices table, it can't be local to
 * init_module. NULL is for unimplemented functions.
 */
struct file_operations Fops = {
	.read = device_read,
	.write = device_write,
	.ioctl = device_ioctl,
	.open = device_open,
	.release = device_release,	/* a.k.a. close */
};

/*
 * Initialize the module - Register the character device
 */
int init_module()
{
	int ret_val;
	/*
	 * Register the character device (atleast try)
	 */
	ret_val = register_chrdev(MAJOR_NUM, DEVICE_NAME, &Fops);

	/*
	 * Negative values signify an error
	 */
	if (ret_val < 0) {
		printk(KERN_ALERT "%s failed with %d\n",
		       "Sorry, registering the character device ", ret_val);
		return ret_val;
	}

	printk(KERN_INFO "%s The major device number is %d.\n",
	       "Registeration is a success", MAJOR_NUM);
	printk(KERN_INFO "If you want to talk to the device driver,\n");
	printk(KERN_INFO "you'll have to create a device file. \n");
	printk(KERN_INFO "We suggest you use:\n");
	printk(KERN_INFO "mknod %s c %d 0\n", DEVICE_FILE_NAME, MAJOR_NUM);
	printk(KERN_INFO "The device file name is important, because\n");
	printk(KERN_INFO "the ioctl program assumes that's the\n");
	printk(KERN_INFO "file you'll use.\n");

	return 0;
}

/*
 * Cleanup - unregister the appropriate file from /proc
 */
void cleanup_module()
{
	int ret;

	/*
	 * Unregister the device
	 */
	ret = unregister_chrdev(MAJOR_NUM, DEVICE_NAME);

	/*
	 * If there's an error, report it
	 */
	if (ret < 0)
		printk(KERN_ALERT "Error: unregister_chrdev: %d\n", ret);
} |
示例 7-2. chardev.h
/* * chardev.h - the header file with the ioctl definitions. * * The declarations here have to be in a header file, because * they need to be known both to the kernel module * (in chardev.c) and the process calling ioctl (ioctl.c) */ #ifndef CHARDEV_H #define CHARDEV_H #include <linux/ioctl.h> /* * The major device number. We can't rely on dynamic * registration any more, because ioctls need to know * it. */ #define MAJOR_NUM 100 /* * Set the message of the device driver */ #define IOCTL_SET_MSG _IOR(MAJOR_NUM, 0, char *) /* * _IOR means that we're creating an ioctl command * number for passing information from a user process * to the kernel module. * * The first arguments, MAJOR_NUM, is the major device * number we're using. * * The second argument is the number of the command * (there could be several with different meanings). * * The third argument is the type we want to get from * the process to the kernel. */ /* * Get the message of the device driver */ #define IOCTL_GET_MSG _IOR(MAJOR_NUM, 1, char *) /* * This IOCTL is used for output, to get the message * of the device driver. However, we still need the * buffer to place the message in to be input, * as it is allocated by the process. */ /* * Get the n'th byte of the message */ #define IOCTL_GET_NTH_BYTE _IOWR(MAJOR_NUM, 2, int) /* * The IOCTL is used for both input and output. It * receives from the user a number, n, and returns * Message[n]. */ /* * The name of the device file */ #define DEVICE_FILE_NAME "char_dev" #endif |
示例 7-3. ioctl.c
/*
 *  ioctl.c - the process to use ioctl's to control the kernel module
 *
 *  Until now we could have used cat for input and output.  But now
 *  we need to do ioctl's, which require writing our own process.
 */

/*
 * device specifics, such as ioctl numbers and the
 * major device file.
 */
#include "chardev.h"

#include <stdio.h>
#include <stdlib.h>
#include <fcntl.h>		/* open */
#include <unistd.h>		/* exit */
#include <sys/ioctl.h>		/* ioctl */

/*
 * Functions for the ioctl calls
 */

ioctl_set_msg(int file_desc, char *message)
{
	int ret_val;

	ret_val = ioctl(file_desc, IOCTL_SET_MSG, message);

	if (ret_val < 0) {
		printf("ioctl_set_msg failed:%d\n", ret_val);
		exit(-1);
	}
}

ioctl_get_msg(int file_desc)
{
	int ret_val;
	char message[100];

	/*
	 * Warning - this is dangerous because we don't tell
	 * the kernel how far it's allowed to write, so it
	 * might overflow the buffer. In a real production
	 * program, we would have used two ioctls - one to tell
	 * the kernel the buffer length and another to give
	 * it the buffer to fill
	 */
	ret_val = ioctl(file_desc, IOCTL_GET_MSG, message);

	if (ret_val < 0) {
		printf("ioctl_get_msg failed:%d\n", ret_val);
		exit(-1);
	}

	printf("get_msg message:%s\n", message);
}

ioctl_get_nth_byte(int file_desc)
{
	int i;
	char c;

	printf("get_nth_byte message:");

	i = 0;
	do {
		c = ioctl(file_desc, IOCTL_GET_NTH_BYTE, i++);

		if (c < 0) {
			printf
			    ("ioctl_get_nth_byte failed at the %d'th byte:\n",
			     i);
			exit(-1);
		}

		putchar(c);
	} while (c != 0);
	putchar('\n');
}

/*
 * Main - Call the ioctl functions
 */
main()
{
	int file_desc, ret_val;
	char *msg = "Message passed by ioctl\n";

	file_desc = open(DEVICE_FILE_NAME, 0);
	if (file_desc < 0) {
		printf("Can't open device file: %s\n", DEVICE_FILE_NAME);
		exit(-1);
	}

	ioctl_get_nth_byte(file_desc);
	ioctl_get_msg(file_desc);
	ioctl_set_msg(file_desc, msg);

	close(file_desc);
} |
第 8 章. 系统调用
8.1. 系统调用
到目前为止,我们唯一做的事情是使用明确定义的内核机制来注册/proc文件和设备处理程序。如果您想做一些内核程序员认为您会想做的事情,例如编写设备驱动程序,这很好。但是,如果您想做一些不寻常的事情,以某种方式更改系统的行为呢?那么,您基本上要靠自己了。
这就是内核编程变得危险的地方。在编写下面的示例时,我杀死了open()系统调用。这意味着我无法打开任何文件,无法运行任何程序,也无法 shutdown 计算机。我不得不拔掉电源开关。幸运的是,没有文件损坏。为确保您也不会丢失任何文件,请在执行 insmod 和 rmmod 之前运行 sync。
忘记/proc文件,忘记设备文件。它们只是次要细节。真正的进程到内核通信机制,所有进程都使用的机制,是系统调用。当进程从内核请求服务时(例如打开文件、fork 到新进程或请求更多内存),使用的就是这种机制。如果您想以有趣的方式更改内核的行为,这就是要这样做的地方。顺便说一句,如果您想查看程序使用了哪些系统调用,请运行 strace <arguments>。
一般来说,进程不应该能够访问内核。它无法访问内核内存,也无法调用内核函数。CPU 的硬件强制执行这一点(这就是它被称为“保护模式”的原因)。
系统调用是此一般规则的例外。发生的情况是,进程用适当的值填充寄存器,然后调用一个特殊指令,该指令跳转到内核中先前定义的位置(当然,该位置用户进程是可读的,但不可写)。在 Intel CPU 下,这是通过中断 0x80 完成的。硬件知道,一旦您跳转到此位置,您就不再以受限用户模式运行,而是作为操作系统内核运行 --- 因此,您被允许做任何您想做的事情。
进程可以跳转到的内核位置称为 system_call。该位置的过程检查系统调用号,该调用号告诉内核进程请求了什么服务。然后,它查看系统调用表(sys_call_table)以查看要调用的内核函数的地址。然后它调用该函数,并在返回后,执行一些系统检查,然后返回到进程(或另一个进程,如果进程时间已用完)。如果您想阅读此代码,它位于源文件arch/$<$architecture$>$/kernel/entry.S,在行ENTRY(system_call).
因此,如果我们想更改某个系统调用的工作方式,我们需要做的是编写我们自己的函数来实现它(通常是通过添加一些我们自己的代码,然后调用原始函数),然后更改sys_call_table处的指针以指向我们的函数。因为我们稍后可能会被删除,并且我们不想使系统处于不稳定状态,所以重要的是cleanup_module恢复表到其原始状态。
这里的源代码是这样一个内核模块的示例。我们想要“监视”某个用户,并printk()在该用户每次打开文件时发送消息。为此,我们将打开文件的系统调用替换为我们自己的函数,称为our_sys_open。此函数检查当前进程的 uid(用户 ID),如果它等于我们监视的 uid,则调用printk()以显示要打开的文件的名称。然后,无论哪种方式,它都会调用原始的open()函数,使用相同的参数,以实际打开文件。
,但用于 init 变量而不是函数。init_module函数替换了sys_call_table中的适当位置,并将原始指针保存在变量中。该cleanup_module函数使用该变量将一切恢复正常。这种方法是危险的,因为两个内核模块可能更改同一个系统调用。想象一下,我们有两个内核模块 A 和 B。A 的 open 系统调用将是 A_open,而 B 的将是 B_open。现在,当 A 被插入内核时,系统调用被替换为 A_open,它将在完成时调用原始的 sys_open。接下来,B 被插入内核,这会将系统调用替换为 B_open,它将在完成时调用它认为是原始系统调用的 A_open。
现在,如果先移除 B,一切都会很好 --- 它只会将系统调用恢复为 A_open,而 A_open 又会调用原始调用。但是,如果先移除 A,然后再移除 B,系统将会崩溃。A 的移除会将系统调用恢复为原始的 sys_open,从而将 B 排除在循环之外。然后,当移除 B 时,它会将系统调用恢复为 它 认为的原始调用 A_open,而 A_open 已不再内存中。乍一看,似乎我们可以通过检查系统调用是否等于我们的 open 函数来解决这个特定问题,如果是,则完全不更改它(这样 B 在移除时就不会更改系统调用),但这会造成更糟糕的问题。当移除 A 时,它会看到系统调用已更改为 B_open,因此它不再指向 A_open,因此它不会在从内存中移除之前将其恢复为 sys_open。不幸的是,B_open 仍然会尝试调用不再存在的 A_open,因此即使不移除 B,系统也会崩溃。
请注意,所有相关问题都使系统调用劫持在生产环境中不可行。为了防止人们做潜在的有害事情,sys_call_table 不再导出。这意味着,如果您想做一些比仅仅试运行此示例更多的事情,您将必须修补当前的内核才能导出 sys_call_table。在示例目录中,您将找到 README 和补丁。正如您可以想象的那样,此类修改不应掉以轻心。不要在有价值的系统(即您不拥有的或不容易恢复的系统)上尝试此操作。您需要以 tarball 形式获取本指南的完整源代码,才能获得补丁和 README。根据您的内核版本,您甚至可能需要手动应用补丁。还在这里吗?嗯,本章也是。如果 Wyle E. Coyote 是内核黑客,这将是他首先尝试的事情。;)
示例 8-1. syscall.c
/*
 *  syscall.c
 *
 *  System call "stealing" sample.
 */

/*
 * Copyright (C) 2001 by Peter Jay Salzman
 */

/*
 * The necessary header files
 */

/*
 * Standard in kernel modules
 */
#include <linux/kernel.h>	/* We're doing kernel work */
#include <linux/module.h>	/* Specifically, a module, */
#include <linux/moduleparam.h>	/* which will have params */
#include <linux/unistd.h>	/* The list of system calls */

/*
 * For the current (process) structure, we need
 * this to know who the current user is.
 */
#include <linux/sched.h>
#include <asm/uaccess.h>

/*
 * The system call table (a table of functions). We
 * just define this as external, and the kernel will
 * fill it up for us when we are insmod'ed
 *
 * sys_call_table is no longer exported in 2.6.x kernels.
 * If you really want to try this DANGEROUS module you will
 * have to apply the supplied patch against your current kernel
 * and recompile it.
 */
extern void *sys_call_table[];

/*
 * UID we want to spy on - will be filled from the
 * command line
 */
static int uid;
module_param(uid, int, 0644);

/*
 * A pointer to the original system call. The reason
 * we keep this, rather than call the original function
 * (sys_open), is because somebody else might have
 * replaced the system call before us. Note that this
 * is not 100% safe, because if another module
 * replaced sys_open before us, then when we're inserted
 * we'll call the function in that module - and it
 * might be removed before we are.
 *
 * Another reason for this is that we can't get sys_open.
 * It's a static variable, so it is not exported.
 */
asmlinkage int (*original_call) (const char *, int, int);

/*
 * The function we'll replace sys_open (the function
 * called when you call the open system call) with. To
 * find the exact prototype, with the number and type
 * of arguments, we find the original function first
 * (it's at fs/open.c).
 *
 * In theory, this means that we're tied to the
 * current version of the kernel. In practice, the
 * system calls almost never change (it would wreck havoc
 * and require programs to be recompiled, since the system
 * calls are the interface between the kernel and the
 * processes).
 */
asmlinkage int our_sys_open(const char *filename, int flags, int mode)
{
	int i = 0;
	char ch;

	/*
	 * Check if this is the user we're spying on
	 */
	if (uid == current->uid) {
		/*
		 * Report the file, if relevant
		 */
		printk("Opened file by %d: ", uid);
		do {
			get_user(ch, filename + i);
			i++;
			printk("%c", ch);
		} while (ch != 0);
		printk("\n");
	}

	/*
	 * Call the original sys_open - otherwise, we lose
	 * the ability to open files
	 */
	return original_call(filename, flags, mode);
}

/*
 * Initialize the module - replace the system call
 */
int init_module()
{
	/*
	 * Warning - too late for it now, but maybe for
	 * next time...
	 */
	printk(KERN_ALERT "I'm dangerous. I hope you did a ");
	printk(KERN_ALERT "sync before you insmod'ed me.\n");
	printk(KERN_ALERT "My counterpart, cleanup_module(), is even");
	printk(KERN_ALERT "more dangerous. If\n");
	printk(KERN_ALERT "you value your file system, it will ");
	printk(KERN_ALERT "be \"sync; rmmod\" \n");
	printk(KERN_ALERT "when you remove this module.\n");

	/*
	 * Keep a pointer to the original function in
	 * original_call, and then replace the system call
	 * in the system call table with our_sys_open
	 */
	original_call = sys_call_table[__NR_open];
	sys_call_table[__NR_open] = our_sys_open;

	/*
	 * To get the address of the function for system
	 * call foo, go to sys_call_table[__NR_foo].
	 */

	printk(KERN_INFO "Spying on UID:%d\n", uid);

	return 0;
}

/*
 * Cleanup - unregister the appropriate file from /proc
 */
void cleanup_module()
{
	/*
	 * Return the system call back to normal
	 */
	if (sys_call_table[__NR_open] != our_sys_open) {
		printk(KERN_ALERT "Somebody else also played with the ");
		printk(KERN_ALERT "open system call\n");
		printk(KERN_ALERT "The system may be left in ");
		printk(KERN_ALERT "an unstable state.\n");
	}

	sys_call_table[__NR_open] = original_call;
} |
第 9 章. 阻塞进程
9.1. 阻塞进程
当有人向您索要您无法立即完成的事情时,您会怎么做?如果您是人类,并且您被人类打扰,您唯一能说的就是:“现在不行,我很忙。走开!”。但是,如果您是内核模块,并且您被进程打扰,则您还有另一种可能性。您可以让进程休眠,直到您可以为其提供服务。毕竟,进程一直被内核置于休眠状态并唤醒(这就是多个进程似乎在单个 CPU 上同时运行的方式)。
这个内核模块就是这方面的一个例子。该文件(称为/proc/sleep)一次只能由一个进程打开。如果文件已打开,则内核模块调用wait_event_interruptible[12]。此函数将任务的状态(任务是内核数据结构,其中包含有关进程及其所在的系统调用的信息,如果有的话)更改为TASK_INTERRUPTIBLE,这意味着该任务在以某种方式唤醒之前不会运行,并将其添加到 WaitQ,即等待访问文件的任务队列。然后,该函数调用调度程序以上下文切换到另一个进程,该进程对 CPU 有一些用途。
当进程完成文件操作后,它会关闭文件,并且module_close被调用。该函数唤醒队列中的所有进程(没有机制只唤醒其中一个)。然后它返回,并且刚刚关闭文件的进程可以继续运行。随着时间的推移,调度程序决定该进程已经足够了,并将 CPU 的控制权交给另一个进程。最终,队列中的进程之一将由调度程序获得 CPU 的控制权。它从调用module_interruptible_sleep_on[13] 之后的位置开始。然后,它可以继续设置一个全局变量,以告知所有其他进程该文件仍处于打开状态并继续其生命周期。当其他进程获得一部分 CPU 时,它们将看到该全局变量并返回休眠。
因此,我们将使用 tail -f 在后台保持文件打开,同时尝试使用另一个进程访问它(同样在后台,这样我们就不需要切换到不同的 vt)。一旦第一个后台进程被 kill %1 杀死,第二个进程就会被唤醒,能够访问该文件并最终终止。
为了让我们的生活更有趣,module_close并非对唤醒等待访问文件的进程具有垄断权。信号,例如 Ctrl+c (SIGINT)也可以唤醒进程。[14] 在这种情况下,我们希望返回-EINTR立即返回。这很重要,这样用户就可以例如在进程接收文件之前杀死它。
还有一点需要记住。有时进程不想休眠,它们要么想立即获得它们想要的东西,要么想被告知无法完成。此类进程使用O_NONBLOCK标志在打开文件时。内核应该通过返回错误代码-EAGAIN来响应否则会阻塞的操作,例如在本示例中打开文件。程序 cat_noblock,在本章的源目录中可用,可用于打开带有O_NONBLOCK.
hostname:~/lkmpg-examples/09-BlockingProcesses# insmod sleep.ko hostname:~/lkmpg-examples/09-BlockingProcesses# cat_noblock /proc/sleep Last input: hostname:~/lkmpg-examples/09-BlockingProcesses# tail -f /proc/sleep & Last input: Last input: Last input: Last input: Last input: Last input: Last input: tail: /proc/sleep: file truncated [1] 6540 hostname:~/lkmpg-examples/09-BlockingProcesses# cat_noblock /proc/sleep Open would block hostname:~/lkmpg-examples/09-BlockingProcesses# kill %1 [1]+ Terminated tail -f /proc/sleep hostname:~/lkmpg-examples/09-BlockingProcesses# cat_noblock /proc/sleep Last input: hostname:~/lkmpg-examples/09-BlockingProcesses# |
示例 9-1. sleep.c
/*
 *  sleep.c - create a /proc file, and if several processes try to open it at
 *  the same time, put all but one to sleep
 */

#include <linux/kernel.h>	/* We're doing kernel work */
#include <linux/module.h>	/* Specifically, a module */
#include <linux/proc_fs.h>	/* Necessary because we use proc fs */
#include <linux/sched.h>	/* For putting processes to sleep and
				   waking them up */
#include <asm/uaccess.h>	/* for get_user and put_user */

/*
 * The module's file functions
 */

/*
 * Here we keep the last message received, to prove that we can process our
 * input
 */
#define MESSAGE_LENGTH 80
static char Message[MESSAGE_LENGTH];

static struct proc_dir_entry *Our_Proc_File;
#define PROC_ENTRY_FILENAME "sleep"

/*
 * Since we use the file operations struct, we can't use the special proc
 * output provisions - we have to use a standard read function, which is this
 * function
 */
static ssize_t module_output(struct file *file,	/* see include/linux/fs.h   */
			     char *buf,	/* The buffer to put data to
					   (in the user segment)    */
			     size_t len,	/* The length of the buffer */
			     loff_t * offset)
{
	static int finished = 0;
	int i;
	char message[MESSAGE_LENGTH + 30];

	/*
	 * Return 0 to signify end of file - that we have nothing
	 * more to say at this point.
	 */
	if (finished) {
		finished = 0;
		return 0;
	}

	/*
	 * If you don't understand this by now, you're hopeless as a kernel
	 * programmer.
	 */
	sprintf(message, "Last input:%s\n", Message);
	for (i = 0; i < len && message[i]; i++)
		put_user(message[i], buf + i);

	finished = 1;
	return i;		/* Return the number of bytes "read" */
}

/*
 * This function receives input from the user when the user writes to the /proc
 * file.
 */
static ssize_t module_input(struct file *file,	/* The file itself */
			    const char *buf,	/* The buffer with input */
			    size_t length,	/* The buffer's length */
			    loff_t * offset)
{				/* offset to file - ignore */
	int i;

	/*
	 * Put the input into Message, where module_output will later be
	 * able to use it
	 */
	for (i = 0; i < MESSAGE_LENGTH - 1 && i < length; i++)
		get_user(Message[i], buf + i);
	/*
	 * we want a standard, zero terminated string
	 */
	Message[i] = '\0';

	/*
	 * We need to return the number of input characters used
	 */
	return i;
}

/*
 * 1 if the file is currently open by somebody
 */
int Already_Open = 0;

/*
 * Queue of processes who want our file
 */
DECLARE_WAIT_QUEUE_HEAD(WaitQ);
/*
 * Called when the /proc file is opened
 */
static int module_open(struct inode *inode, struct file *file)
{
	/*
	 * If the file's flags include O_NONBLOCK, it means the process doesn't
	 * want to wait for the file.  In this case, if the file is already
	 * open, we should fail with -EAGAIN, meaning "you'll have to try
	 * again", instead of blocking a process which would rather stay awake.
	 */
	if ((file->f_flags & O_NONBLOCK) && Already_Open)
		return -EAGAIN;

	/*
	 * This is the correct place for try_module_get(THIS_MODULE) because
	 * if a process is in the loop, which is within the kernel module,
	 * the kernel module must not be removed.
	 */
	try_module_get(THIS_MODULE);

	/*
	 * If the file is already open, wait until it isn't
	 */

	while (Already_Open) {
		int i, is_sig = 0;

		/*
		 * This function puts the current process, including any system
		 * calls, such as us, to sleep.  Execution will be resumed right
		 * after the function call, either because somebody called
		 * wake_up(&WaitQ) (only module_close does that, when the file
		 * is closed) or when a signal, such as Ctrl-C, is sent
		 * to the process
		 */
		wait_event_interruptible(WaitQ, !Already_Open);

		/*
		 * If we woke up because we got a signal we're not blocking,
		 * return -EINTR (fail the system call).  This allows processes
		 * to be killed or stopped.
		 */

/*
 * Emmanuel Papirakis:
 *
 * This is a little update to work with 2.2.*.  Signals now are contained in
 * two words (64 bits) and are stored in a structure that contains an array of
 * two unsigned longs.  We now have to make 2 checks in our if.
 *
 * Ori Pomerantz:
 *
 * Nobody promised me they'll never use more than 64 bits, or that this book
 * won't be used for a version of Linux with a word size of 16 bits.  This code
 * would work in any case.
 */
		for (i = 0; i < _NSIG_WORDS && !is_sig; i++)
			is_sig =
			    current->pending.signal.sig[i] & ~current->
			    blocked.sig[i];

		if (is_sig) {
			/*
			 * It's important to put module_put(THIS_MODULE) here,
			 * because for processes where the open is interrupted
			 * there will never be a corresponding close. If we
			 * don't decrement the usage count here, we will be
			 * left with a positive usage count which we'll have no
			 * way to bring down to zero, giving us an immortal
			 * module, which can only be killed by rebooting
			 * the machine.
			 */
			module_put(THIS_MODULE);
			return -EINTR;
		}
	}

	/*
	 * If we got here, Already_Open must be zero
	 */

	/*
	 * Open the file
	 */
	Already_Open = 1;
	return 0;		/* Allow the access */
}

/*
 * Called when the /proc file is closed
 */
int module_close(struct inode *inode, struct file *file)
{
	/*
	 * Set Already_Open to zero, so one of the processes in the WaitQ will
	 * be able to set Already_Open back to one and to open the file. All
	 * the other processes will be called when Already_Open is back to one,
	 * so they'll go back to sleep.
	 */
	Already_Open = 0;

	/*
	 * Wake up all the processes in WaitQ, so if anybody is waiting for the
	 * file, they can have it.
	 */
	wake_up(&WaitQ);

	module_put(THIS_MODULE);

	return 0;		/* success */
}

/*
 * This function decides whether to allow an operation (return zero) or not
 * allow it (return a non-zero which indicates why it is not allowed).
 *
 * The operation can be one of the following values:
 * 0 - Execute (run the "file" - meaningless in our case)
 * 2 - Write (input to the kernel module)
 * 4 - Read (output from the kernel module)
 *
 * This is the real function that checks file permissions. The permissions
 * returned by ls -l are for reference only, and can be overridden here.
 */
static int module_permission(struct inode *inode, int op, struct nameidata *nd)
{
	/*
	 * We allow everybody to read from our module, but only root (uid 0)
	 * may write to it
	 */
	if (op == 4 || (op == 2 && current->euid == 0))
		return 0;

	/*
	 * If it's anything else, access is denied
	 */
	return -EACCES;
}

/*
 * Structures to register as the /proc file, with pointers to all the relevant
 * functions.
 */

/*
 * File operations for our proc file. This is where we place pointers to all
 * the functions called when somebody tries to do something to our file. NULL
 * means we don't want to deal with something.
 */
static struct file_operations File_Ops_4_Our_Proc_File = {
	.read = module_output,	/* "read" from the file */
	.write = module_input,	/* "write" to the file */
	.open = module_open,	/* called when the /proc file is opened */
	.release = module_close,	/* called when it's closed */
};

/*
 * Inode operations for our proc file.  We need it so we'll have somewhere to
 * specify the file operations structure we want to use, and the function we
 * use for permissions. It's also possible to specify functions to be called
 * for anything else which could be done to an inode (although we don't bother,
 * we just put NULL).
 */

static struct inode_operations Inode_Ops_4_Our_Proc_File = {
	.permission = module_permission,	/* check for permissions */
};

/*
 * Module initialization and cleanup
 */

/*
 * Initialize the module - register the proc file
 */

int init_module()
{

	Our_Proc_File = create_proc_entry(PROC_ENTRY_FILENAME, 0644, NULL);

	if (Our_Proc_File == NULL) {
		remove_proc_entry(PROC_ENTRY_FILENAME, &proc_root);
		printk(KERN_ALERT "Error: Could not initialize /proc/test\n");
		return -ENOMEM;
	}

	Our_Proc_File->owner = THIS_MODULE;
	Our_Proc_File->proc_iops = &Inode_Ops_4_Our_Proc_File;
	Our_Proc_File->proc_fops = &File_Ops_4_Our_Proc_File;
	Our_Proc_File->mode = S_IFREG | S_IRUGO | S_IWUSR;
	Our_Proc_File->uid = 0;
	Our_Proc_File->gid = 0;
	Our_Proc_File->size = 80;

	printk(KERN_INFO "/proc/test created\n");

	return 0;
}

/*
 * Cleanup - unregister our file from /proc.  This could get dangerous if
 * there are still processes waiting in WaitQ, because they are inside our
 * open function, which will get unloaded. I'll explain how to avoid removal
 * of a kernel module in such a case in chapter 10.
 */
void cleanup_module()
{
	remove_proc_entry(PROC_ENTRY_FILENAME, &proc_root);

	printk(KERN_INFO "/proc/test removed\n");
} |
示例 9-2. cat_noblock.c
/* cat_noblock.c - open a file and display its contents, but exit rather than
 * wait for input */


/* Copyright (C) 1998 by Ori Pomerantz */


#include <stdio.h>    /* standard I/O */
#include <fcntl.h>    /* for open */
#include <unistd.h>   /* for read */
#include <stdlib.h>   /* for exit */
#include <errno.h>    /* for errno */

#define MAX_BYTES 1024*4


main(int argc, char *argv[])
{
  int    fd;  /* The file descriptor for the file to read */
  size_t bytes; /* The number of bytes read */
  char   buffer[MAX_BYTES]; /* The buffer for the bytes */


  /* Usage */
  if (argc != 2) {
    printf("Usage: %s <filename>\n", argv[0]);
    puts("Reads the content of a file, but doesn't wait for input");
    exit(-1);
  }

  /* Open the file for reading in non blocking mode */
  fd = open(argv[1], O_RDONLY | O_NONBLOCK);

  /* If open failed */
  if (fd == -1) {
    if (errno = EAGAIN)
      puts("Open would block");
    else
      puts("Open failed");
    exit(-1);
  }

  /* Read the file and output its contents */
  do {
    int i;

    /* Read characters from the file */
    bytes = read(fd, buffer, MAX_BYTES);

    /* If there's an error, report it and die */
    if (bytes == -1) {
      if (errno = EAGAIN)
	puts("Normally I'd block, but you told me not to");
      else
	puts("Another read error");
      exit(-1);
    }

    /* Print the characters */
    if (bytes > 0) {
      for(i=0; i<bytes; i++)
	putchar(buffer[i]);
    }

    /* While there are no errors and the file isn't over */
  } while (bytes > 0);
} |
第 10 章. 替换 Printks
10.1. 替换printk
在 第 1.2.1.2 节 中,我说过 X 和内核模块编程不兼容。这对于开发内核模块来说是正确的,但在实际使用中,您希望能够将消息发送到加载模块的命令来自的任何 tty[15]。
完成此操作的方法是使用current,它是指向当前正在运行的任务的指针,用于获取当前任务的 tty 结构。然后,我们查看该 tty 结构内部,找到指向字符串写入函数的指针,我们使用该指针将字符串写入 tty。
示例 10-1. print_string.c
/*
 *  print_string.c - Send output to the tty we're running on, regardless if it's
 *  through X11, telnet, etc.  We do this by printing the string to the tty
 *  associated with the current task.
 */
#include <linux/kernel.h>
#include <linux/module.h>
#include <linux/init.h>
#include <linux/sched.h>	/* For current */
#include <linux/tty.h>		/* For the tty declarations */
#include <linux/version.h>	/* For LINUX_VERSION_CODE */

MODULE_LICENSE("GPL");
MODULE_AUTHOR("Peter Jay Salzman");

static void print_string(char *str)
{
	struct tty_struct *my_tty;

	/*
	 * tty struct went into signal struct in 2.6.6
	 */
#if ( LINUX_VERSION_CODE <= KERNEL_VERSION(2,6,5) )
	/*
	 * The tty for the current task
	 */
	my_tty = current->tty;
#else
	/*
	 * The tty for the current task, for 2.6.6+ kernels
	 */
	my_tty = current->signal->tty;
#endif

	/*
	 * If my_tty is NULL, the current task has no tty you can print to
	 * (ie, if it's a daemon).  If so, there's nothing we can do.
	 */
	if (my_tty != NULL) {

		/*
		 * my_tty->driver is a struct which holds the tty's functions,
		 * one of which (write) is used to write strings to the tty.
		 * It can be used to take a string either from the user's or
		 * kernel's memory segment.
		 *
		 * The function's 1st parameter is the tty to write to,
		 * because the same function would normally be used for all
		 * tty's of a certain type.  The 2nd parameter controls
		 * whether the function receives a string from kernel
		 * memory (false, 0) or from user memory (true, non zero).
		 * BTW: this param has been removed in Kernels > 2.6.9
		 * The (2nd) 3rd parameter is a pointer to a string.
		 * The (3rd) 4th parameter is the length of the string.
		 *
		 * As you will see below, sometimes it's necessary to use
		 * preprocessor stuff to create code that works for different
		 * kernel versions. The (naive) approach we've taken here
		 * does not scale well. The right way to deal with this
		 * is described in section 2 of
		 * linux/Documentation/SubmittingPatches
		 */
		((my_tty->driver)->write) (my_tty,	/* The tty itself */
#if ( LINUX_VERSION_CODE <= KERNEL_VERSION(2,6,9) )
					   0,	/* Don't take the string
						   from user space        */
#endif
					   str,	/* String                 */
					   strlen(str));	/* Length */

		/*
		 * ttys were originally hardware devices, which (usually)
		 * strictly followed the ASCII standard.  In ASCII, to move to
		 * a new line you need two characters, a carriage return and a
		 * line feed.  On Unix, the ASCII line feed is used for both
		 * purposes - so we can't just use \n, because it wouldn't have
		 * a carriage return and the next line will start at the
		 * column right after the line feed.
		 *
		 * This is why text files are different between Unix and
		 * MS Windows.  In CP/M and derivatives, like MS-DOS and
		 * MS Windows, the ASCII standard was strictly adhered to,
		 * and therefore a newline requirs both a LF and a CR.
		 */

#if ( LINUX_VERSION_CODE <= KERNEL_VERSION(2,6,9) )
		((my_tty->driver)->write) (my_tty, 0, "\015\012", 2);
#else
		((my_tty->driver)->write) (my_tty, "\015\012", 2);
#endif
	}
}

static int __init print_string_init(void)
{
	print_string("The module has been inserted.  Hello world!");
	return 0;
}

static void __exit print_string_exit(void)
{
	print_string("The module has been removed.  Farewell world!");
}

module_init(print_string_init);
module_exit(print_string_exit); |
10.2. 闪烁键盘 LED
在某些情况下,您可能希望有一种更简单、更直接的方式与外部世界通信。闪烁键盘 LED 可以是一种这样的解决方案:这是一种立即引起注意或显示状态条件的直接方式。键盘 LED 存在于每个硬件上,它们始终可见,不需要任何设置,并且与写入 tty 或文件相比,它们的使用相当简单且非侵入性。
以下源代码说明了一个最小的内核模块,该模块在加载后,会开始闪烁键盘 LED,直到卸载为止。
示例 10-2. kbleds.c
/*
 *  kbleds.c - Blink keyboard leds until the module is unloaded.
 */

#include <linux/module.h>
#include <linux/config.h>
#include <linux/init.h>
#include <linux/tty.h>		/* For fg_console, MAX_NR_CONSOLES */
#include <linux/kd.h>		/* For KDSETLED */
#include <linux/vt.h>
#include <linux/console_struct.h>	/* For vc_cons */

MODULE_DESCRIPTION("Example module illustrating the use of Keyboard LEDs.");
MODULE_AUTHOR("Daniele Paolo Scarpazza");
MODULE_LICENSE("GPL");

struct timer_list my_timer;
struct tty_driver *my_driver;
char kbledstatus = 0;

#define BLINK_DELAY   HZ/5
#define ALL_LEDS_ON   0x07
#define RESTORE_LEDS  0xFF

/*
 * Function my_timer_func blinks the keyboard LEDs periodically by invoking
 * command KDSETLED of ioctl() on the keyboard driver. To learn more on virtual
 * terminal ioctl operations, please see file:
 *     /usr/src/linux/drivers/char/vt_ioctl.c, function vt_ioctl().
 *
 * The argument to KDSETLED is alternatively set to 7 (thus causing the led
 * mode to be set to LED_SHOW_IOCTL, and all the leds are lit) and to 0xFF
 * (any value above 7 switches back the led mode to LED_SHOW_FLAGS, thus
 * the LEDs reflect the actual keyboard status).  To learn more on this,
 * please see file:
 *     /usr/src/linux/drivers/char/keyboard.c, function setledstate().
 *
 */

static void my_timer_func(unsigned long ptr)
{
	int *pstatus = (int *)ptr;

	if (*pstatus == ALL_LEDS_ON)
		*pstatus = RESTORE_LEDS;
	else
		*pstatus = ALL_LEDS_ON;

	(my_driver->ioctl) (vc_cons[fg_console].d->vc_tty, NULL, KDSETLED,
			    *pstatus);

	my_timer.expires = jiffies + BLINK_DELAY;
	add_timer(&my_timer);
}

static int __init kbleds_init(void)
{
	int i;

	printk(KERN_INFO "kbleds: loading\n");
	printk(KERN_INFO "kbleds: fgconsole is %x\n", fg_console);
	for (i = 0; i < MAX_NR_CONSOLES; i++) {
		if (!vc_cons[i].d)
			break;
		printk(KERN_INFO "poet_atkm: console[%i/%i] #%i, tty %lx\n", i,
		       MAX_NR_CONSOLES, vc_cons[i].d->vc_num,
		       (unsigned long)vc_cons[i].d->vc_tty);
	}
	printk(KERN_INFO "kbleds: finished scanning consoles\n");

	my_driver = vc_cons[fg_console].d->vc_tty->driver;
	printk(KERN_INFO "kbleds: tty driver magic %x\n", my_driver->magic);

	/*
	 * Set up the LED blink timer the first time
	 */
	init_timer(&my_timer);
	my_timer.function = my_timer_func;
	my_timer.data = (unsigned long)&kbledstatus;
	my_timer.expires = jiffies + BLINK_DELAY;
	add_timer(&my_timer);

	return 0;
}

static void __exit kbleds_cleanup(void)
{
	printk(KERN_INFO "kbleds: unloading...\n");
	del_timer(&my_timer);
	(my_driver->ioctl) (vc_cons[fg_console].d->vc_tty, NULL, KDSETLED,
			    RESTORE_LEDS);
}

module_init(kbleds_init);
module_exit(kbleds_cleanup); |
如果本章中的示例都不适合您的调试需求,那么可能还有其他技巧可以尝试。有没有想过 make menuconfig 中的 CONFIG_LL_DEBUG 有什么用?如果您激活它,您将获得对串行端口的低级访问权限。虽然这本身听起来可能不是很强大,但您可以修补kernel/printk.c或任何其他基本系统调用以使用 printascii,从而可以跟踪您的代码在串行线上所做的几乎所有事情。如果您发现自己正在将内核移植到一些新的和以前不支持的架构,这通常是应该首先实现的事情之一。通过 netconsole 进行日志记录也可能值得一试。
虽然您在这里看到了许多可以用来帮助调试的东西,但有些事情需要注意。调试几乎总是具有侵入性的。添加调试代码可能会充分改变情况,使错误看起来消失了。因此,您应该尝试将调试代码保持在最低限度,并确保它不会出现在生产代码中。
第 11 章. 调度任务
11.1. 调度任务
通常,我们有 “内务处理” 任务,必须在特定时间或每隔一段时间完成。如果任务要由进程完成,我们通过将其放入crontab文件中来完成。如果任务要由内核模块完成,我们有两种可能性。第一种是将进程放入crontab文件中,该文件将在必要时通过系统调用唤醒模块,例如通过打开文件。然而,这是非常低效的——我们从crontab运行一个新进程,将新的可执行文件读取到内存中,而所有这一切只是为了唤醒无论如何都在内存中的内核模块。
与其这样做,不如创建一个函数,该函数将在每次定时器中断时调用一次。我们这样做的方式是创建一个任务,该任务保存在 workqueue_struct 结构中,该结构将保存指向该函数的指针。然后,我们使用queue_delayed_work将该任务放在名为 my_workqueue 的任务列表中,该列表是要在下一个定时器中断时执行的任务列表。因为我们希望该函数继续执行,所以每当调用该函数时,我们需要将其放回 my_workqueue,以便在下一个定时器中断时执行。
这里还有一点我们需要记住。当模块被 rmmod 移除时,首先会检查其引用计数。如果为零,则module_cleanup被调用。然后,该模块将与其所有函数一起从内存中移除。需要正确关闭所有内容,否则会发生不好的事情。请参阅下面的代码,了解如何以安全的方式完成此操作。
示例 11-1. sched.c
/*
 *  sched.c - scheduale a function to be called on every timer interrupt.
 *
 *  Copyright (C) 2001 by Peter Jay Salzman
 */

/*
 * The necessary header files
 */

/*
 * Standard in kernel modules
 */
#include <linux/kernel.h>	/* We're doing kernel work */
#include <linux/module.h>	/* Specifically, a module */
#include <linux/proc_fs.h>	/* Necessary because we use the proc fs */
#include <linux/workqueue.h>	/* We scheduale tasks here */
#include <linux/sched.h>	/* We need to put ourselves to sleep
				   and wake up later */
#include <linux/init.h>		/* For __init and __exit */
#include <linux/interrupt.h>	/* For irqreturn_t */

struct proc_dir_entry *Our_Proc_File;
#define PROC_ENTRY_FILENAME "sched"
#define MY_WORK_QUEUE_NAME "WQsched.c"

/*
 * The number of times the timer interrupt has been called so far
 */
static int TimerIntrpt = 0;

static void intrpt_routine(void *);

static int die = 0;		/* set this to 1 for shutdown */

/*
 * The work queue structure for this task, from workqueue.h
 */
static struct workqueue_struct *my_workqueue;

static struct work_struct Task;
static DECLARE_WORK(Task, intrpt_routine, NULL);

/*
 * This function will be called on every timer interrupt. Notice the void*
 * pointer - task functions can be used for more than one purpose, each time
 * getting a different parameter.
 */
static void intrpt_routine(void *irrelevant)
{
	/*
	 * Increment the counter
	 */
	TimerIntrpt++;

	/*
	 * If cleanup wants us to die
	 */
	if (die == 0)
		queue_delayed_work(my_workqueue, &Task, 100);
}

/*
 * Put data into the proc fs file.
 */
ssize_t
procfile_read(char *buffer,
	      char **buffer_location,
	      off_t offset, int buffer_length, int *eof, void *data)
{
	int len;		/* The number of bytes actually used */

	/*
	 * It's static so it will still be in memory
	 * when we leave this function
	 */
	static char my_buffer[80];

	/*
	 * We give all of our information in one go, so if anybody asks us
	 * if we have more information the answer should always be no.
	 */
	if (offset > 0)
		return 0;

	/*
	 * Fill the buffer and get its length
	 */
	len = sprintf(my_buffer, "Timer called %d times so far\n", TimerIntrpt);

	/*
	 * Tell the function which called us where the buffer is
	 */
	*buffer_location = my_buffer;

	/*
	 * Return the length
	 */
	return len;
}

/*
 * Initialize the module - register the proc file
 */
int __init init_module()
{
	/*
	 * Create our /proc file
	 */
	Our_Proc_File = create_proc_entry(PROC_ENTRY_FILENAME, 0644, NULL);

	if (Our_Proc_File == NULL) {
		remove_proc_entry(PROC_ENTRY_FILENAME, &proc_root);
		printk(KERN_ALERT "Error: Could not initialize /proc/%s\n",
		       PROC_ENTRY_FILENAME);
		return -ENOMEM;
	}

	Our_Proc_File->read_proc = procfile_read;
	Our_Proc_File->owner = THIS_MODULE;
	Our_Proc_File->mode = S_IFREG | S_IRUGO;
	Our_Proc_File->uid = 0;
	Our_Proc_File->gid = 0;
	Our_Proc_File->size = 80;

	/*
	 * Put the task in the work_timer task queue, so it will be executed at
	 * next timer interrupt
	 */
	my_workqueue = create_workqueue(MY_WORK_QUEUE_NAME);
	queue_delayed_work(my_workqueue, &Task, 100);


	printk(KERN_INFO "/proc/%s created\n", PROC_ENTRY_FILENAME);

	return 0;
}

/*
 * Cleanup
 */
void __exit cleanup_module()
{
	/*
	 * Unregister our /proc file
	 */
	remove_proc_entry(PROC_ENTRY_FILENAME, &proc_root);
	printk(KERN_INFO "/proc/%s removed\n", PROC_ENTRY_FILENAME);

	die = 1;		/* keep intrp_routine from queueing itself */
	cancel_delayed_work(&Task);	/* no "new ones" */
	flush_workqueue(my_workqueue);	/* wait till all "old ones" finished */
	destroy_workqueue(my_workqueue);

	/*
	 * Sleep until intrpt_routine is called one last time. This is
	 * necessary, because otherwise we'll deallocate the memory holding
	 * intrpt_routine and Task while work_timer still references them.
	 * Notice that here we don't allow signals to interrupt us.
	 *
	 * Since WaitQ is now not NULL, this automatically tells the interrupt
	 * routine it's time to die.
	 */

}

/*
 * some work_queue related functions
 * are just available to GPL licensed Modules
 */
MODULE_LICENSE("GPL"); |
第 12 章. 中断处理程序
12.1. 中断处理程序
12.1.1. 中断处理程序
除了上一章之外,到目前为止我们在内核中所做的一切都是响应进程的请求而完成的,无论是通过处理特殊文件、发送ioctl(),还是发出系统调用。但是,内核的工作不仅仅是响应进程请求。另一项同样重要的工作是与连接到机器的硬件对话。
CPU 与计算机其余硬件之间有两种类型的交互。第一种类型是 CPU 向硬件发出命令,另一种类型是硬件需要告诉 CPU 某些事情。第二种类型称为中断,它更难实现,因为它必须在硬件方便时处理,而不是在 CPU 方便时处理。硬件设备通常只有少量 RAM,如果您不读取其可用信息,则会丢失。
在 Linux 下,硬件中断称为 IRQ(InterruptRe quests)[16]。IRQ 有两种类型,短 IRQ 和长 IRQ。短 IRQ 是指预计占用 非常 短的时间段的中断,在此期间,机器的其余部分将被阻止,并且不会处理其他中断。长 IRQ 是指可能占用更长时间的中断,在此期间可能会发生其他中断(但不会发生来自同一设备的中断)。如果可能,最好将中断处理程序声明为长中断。
当 CPU 接收到中断时,它会停止正在执行的任何操作(除非它正在处理更重要的中断,在这种情况下,它只会在更重要的中断完成后才处理此中断),将某些参数保存在堆栈上并调用中断处理程序。这意味着在中断处理程序本身中不允许某些操作,因为系统处于未知状态。解决此问题的方法是让中断处理程序立即执行需要完成的操作,通常是从硬件读取某些内容或向硬件发送某些内容,然后在稍后的时间安排处理新信息(这称为 “下半部”)并返回。然后,内核保证尽快调用下半部 --- 并且当它这样做时,内核模块中允许的所有内容都将被允许。
实现此目的的方法是调用request_irq()以在接收到相关 IRQ 时调用您的中断处理程序。[17] 此函数接收 IRQ 编号、函数名称、标志、用于/proc/interrupts的名称以及要传递给中断处理程序的参数。通常有一定数量的可用 IRQ。IRQ 的数量取决于硬件。标志可以包括SA_SHIRQ以指示您愿意与其他中断处理程序共享 IRQ(通常是因为多个硬件设备位于同一 IRQ 上)和SA_INTERRUPT以指示这是一个快速中断。只有在此 IRQ 上尚无处理程序,或者您都愿意共享时,此函数才会成功。
然后,在中断处理程序中,我们与硬件通信,然后使用queue_work() mark_bh(BH_IMMEDIATE)来调度下半部。
12.1.2. Intel 架构上的键盘
本章的其余部分完全是 Intel 特定的。如果您不是在 Intel 平台上运行,它将无法工作。甚至不要尝试编译这里的代码。
我在编写本章的示例代码时遇到了问题。一方面,为了使示例有用,它必须在每个人的计算机上运行并获得有意义的结果。另一方面,内核已经包含了所有常见设备的设备驱动程序,而这些设备驱动程序无法与我要编写的内容共存。我找到的解决方案是为键盘中断编写一些内容,并首先禁用常规键盘中断处理程序。由于它在内核源文件中被定义为静态符号(具体来说,drivers/char/keyboard.c),因此无法恢复它。在insmod此代码之前,请在另一个终端上执行sleep 120; reboot如果您重视您的文件系统。
此代码将自身绑定到 IRQ 1,这是 Intel 架构下控制的键盘的 IRQ。然后,当它接收到键盘中断时,它会读取键盘的状态(这就是inb(0x64))和扫描码,扫描码是键盘返回的值。然后,只要内核认为可行,它就会运行got_char,它提供所用键的代码(扫描码的前七位)以及它是否已被按下(如果第 8 位为零)或释放(如果为 1)。
示例 12-1. intrpt.c
/*
 *  intrpt.c - An interrupt handler.
 *
 *  Copyright (C) 2001 by Peter Jay Salzman
 */

/*
 * The necessary header files
 */

/*
 * Standard in kernel modules
 */
#include <linux/kernel.h>	/* We're doing kernel work */
#include <linux/module.h>	/* Specifically, a module */
#include <linux/sched.h>
#include <linux/workqueue.h>
#include <linux/interrupt.h>	/* We want an interrupt */
#include <asm/io.h>

#define MY_WORK_QUEUE_NAME "WQsched.c"

static struct workqueue_struct *my_workqueue;

/*
 * This will get called by the kernel as soon as it's safe
 * to do everything normally allowed by kernel modules.
 */
static void got_char(void *scancode)
{
	printk(KERN_INFO "Scan Code %x %s.\n",
	       (int)*((char *)scancode) & 0x7F,
	       *((char *)scancode) & 0x80 ? "Released" : "Pressed");
}

/*
 * This function services keyboard interrupts. It reads the relevant
 * information from the keyboard and then puts the non time critical
 * part into the work queue. This will be run when the kernel considers it safe.
 */
irqreturn_t irq_handler(int irq, void *dev_id, struct pt_regs *regs)
{
	/*
	 * This variables are static because they need to be
	 * accessible (through pointers) to the bottom half routine.
	 */
	static int initialised = 0;
	static unsigned char scancode;
	static struct work_struct task;
	unsigned char status;

	/*
	 * Read keyboard status
	 */
	status = inb(0x64);
	scancode = inb(0x60);

	if (initialised == 0) {
		INIT_WORK(&task, got_char, &scancode);
		initialised = 1;
	} else {
		PREPARE_WORK(&task, got_char, &scancode);
	}

	queue_work(my_workqueue, &task);

	return IRQ_HANDLED;
}

/*
 * Initialize the module - register the IRQ handler
 */
int init_module()
{
	my_workqueue = create_workqueue(MY_WORK_QUEUE_NAME);

	/*
	 * Since the keyboard handler won't co-exist with another handler,
	 * such as us, we have to disable it (free its IRQ) before we do
	 * anything.  Since we don't know where it is, there's no way to
	 * reinstate it later - so the computer will have to be rebooted
	 * when we're done.
	 */
	free_irq(1, NULL);

	/*
	 * Request IRQ 1, the keyboard IRQ, to go to our irq_handler.
	 * SA_SHIRQ means we're willing to have othe handlers on this IRQ.
	 * SA_INTERRUPT can be used to make the handler into a fast interrupt.
	 */
	return request_irq(1,	/* The number of the keyboard IRQ on PCs */
			   irq_handler,	/* our handler */
			   SA_SHIRQ, "test_keyboard_irq_handler",
			   (void *)(irq_handler));
}

/*
 * Cleanup
 */
void cleanup_module()
{
	/*
	 * This is only here for completeness. It's totally irrelevant, since
	 * we don't have a way to restore the normal keyboard interrupt so the
	 * computer is completely useless and has to be rebooted.
	 */
	free_irq(1, NULL);
}

/*
 * some work_queue related functions are just available to GPL licensed Modules
 */
MODULE_LICENSE("GPL");
|
第 13 章. 对称多处理
13.1. 对称多处理
提高硬件性能最简单、最便宜的方法之一是在主板上放置多个 CPU。这可以通过使不同的 CPU 承担不同的工作(非对称多处理)或通过使它们全部并行运行,执行相同的工作(对称多处理,又名 SMP)来完成。有效地进行非对称多处理需要有关计算机应执行的任务的专门知识,这在 Linux 等通用操作系统中是不可用的。另一方面,对称多处理相对容易实现。
相对容易,我的意思正是这样:不是 真的 容易。在对称多处理环境中,CPU 共享相同的内存,因此在一个 CPU 中运行的代码可能会影响另一个 CPU 使用的内存。您不再能确定您在前一行中设置为特定值的变量是否仍具有该值;当您不注意时,另一个 CPU 可能已经对其进行了操作。显然,像这样编程是不可能的。
在进程编程的情况下,这通常不是问题,因为一个进程通常一次只在一个 CPU 上运行[18]。另一方面,内核可以由在不同 CPU 上运行的不同进程调用。
在 2.0.x 版本中,这不是问题,因为整个内核都在一个大的自旋锁中。这意味着,如果一个 CPU 在内核中,而另一个 CPU 想要进入,例如因为系统调用,它必须等到第一个 CPU 完成。这使得 Linux SMP 安全[19],但效率低下。
在 2.2.x 版本中,多个 CPU 可以同时位于内核中。这是模块编写者需要注意的事情。
附录 A. 更改:2.0 到 2.2
A.1. 2.4 和 2.6 之间的更改
A.1.1. 2.4 和 2.6 之间的更改
我对整个内核的了解还不够深入,无法记录所有更改。通过将此版本的 LKMPG 与内核 2.4 的对应版本进行比较,可以找到一些移植提示。除此之外,任何需要将驱动程序从 2.4 移植到 2.6 内核的人都可能想访问 http://lwn.net/Articles/driver-porting/ 。如果您仍然无法在那里找到完全满足您需求的示例,请找到一个与您的驱动程序类似并在两个内核版本中都存在的驱动程序。文件比较工具(如 xxdiff 或 meld )届时将大有帮助。另请检查您的驱动程序是否包含在linux/Documentation/中的文档中。在开始移植之前,如果您遇到困难,最好找到合适的邮件列表,并向那里的人们寻求指导。
附录 B. 后续步骤
B.1. 后续步骤?
我本可以轻松地在这本书中挤出更多章节。我可以添加一章关于创建新文件系统的章节,或者关于添加新协议栈的章节(好像有这个必要一样——您必须深入地下才能找到 Linux 不支持的协议栈)。我可以添加对我们尚未涉及的内核机制的解释,例如引导或磁盘接口。
然而,我选择不那样做。我写这本书的目的是为了引导读者入门内核模块编程的奥秘,并教授用于此目的的常用技术。 对于那些对内核编程真正感兴趣的人,我推荐 Juan-Mariano de Goyeneche 的内核资源列表。 此外,正如 Linus 所说,学习内核的最佳方法是亲自阅读源代码。
如果您对更多简短的内核模块示例感兴趣,我推荐 Phrack 杂志。 即使您对安全不感兴趣(但作为程序员,您应该感兴趣),那里的内核模块也是您可以在内核内部完成的事情的很好的例子,而且它们足够简短,不需要花费太多精力来理解。
我希望我已经帮助您在成为一名更优秀的程序员的道路上有所帮助,或者至少通过技术获得乐趣。 而且,如果您确实编写了有用的内核模块,我希望您在 GPL 许可下发布它们,这样我也能使用它们。
如果您想为本指南做出贡献,请联系维护者之一以获取详细信息。 正如您已经看到的,现在有一个占位章节,等待用 sysfs 的示例来填充。
索引
符号
- /etc/conf.modules, 模块是如何进入内核的?
- /etc/modules.conf, 模块是如何进入内核的?
- /proc 文件系统, /proc 文件系统
- /proc/interrupts, 中断处理程序
- /proc/kallsyms, 模块可用的函数, 命名空间, 常见陷阱
- /proc/meminfo, /proc 文件系统
- /proc/modules, 模块是如何进入内核的?, /proc 文件系统
- 2.6 变更, 2.4 和 2.6 之间的变更
- _IO, 与设备文件对话(写入和 IOCTL)
- _IOR, 与设备文件对话(写入和 IOCTL)
- _IOW, 与设备文件对话(写入和 IOCTL)
- _IOWR, 与设备文件对话(写入和 IOCTL)
- __exit, Hello World (第 3 部分):__init 和 __exit 宏
- __init, Hello World (第 3 部分):__init 和 __exit 宏
- __initdata, Hello World (第 3 部分):__init 和 __exit 宏
- __initfunction(), Hello World (第 3 部分):__init 和 __exit 宏
C
- 食肉动物 (carnivore)
- 大型, 常见陷阱
- cleanup_module(), Hello, World (第 1 部分):最简单的模块
- 代码空间, 代码空间
- 咖啡, 主设备号和次设备号
- copy_from_user, 读取和写入 /proc 文件
- copy_to_user, 读取和写入 /proc 文件
- CPU
- 多核, 对称多处理
- crontab, 调度任务
- ctrl-c, 阻塞进程
- 当前任务, 替换 printk
D
- DEFAULT_MESSAGE_LOGLEVEL, 介绍 printk()
- 定义 ioctl, 与设备文件对话(写入和 IOCTL)
- 设备文件
- 字符设备, 字符设备驱动程序
- 设备文件
- 输入到, 与设备文件对话(写入和 IOCTL)
- 写入到, 与设备文件对话(写入和 IOCTL)
F
- 文件, 文件结构
- 文件系统
- /proc, /proc 文件系统
- 注册, 使用标准文件系统管理 /proc 文件
- 文件系统注册, 使用标准文件系统管理 /proc 文件
- file_operations, file_operations 结构
- file_operations 结构, 使用标准文件系统管理 /proc 文件
I
- inb, Intel 架构上的键盘
- init_module(), Hello, World (第 1 部分):最简单的模块
- inode, 文件结构, /proc 文件系统
- inode_operations 结构, 使用标准文件系统管理 /proc 文件
- insmod, 编译内核模块, 系统调用
- Intel 架构
- 键盘, Intel 架构上的键盘
- 中断 0x80, 系统调用
- 中断处理程序, 中断处理程序
- interruptible_sleep_on, 阻塞进程
- 中断
- 禁用, 常见陷阱
- ioctl, 与设备文件对话(写入和 IOCTL)
- 定义, 与设备文件对话(写入和 IOCTL)
- 官方分配, 与设备文件对话(写入和 IOCTL)
K
- 内核
- 版本, 2.4 和 2.6 之间的变更
- 内核版本, 为多个内核版本编写模块
- kerneld, 模块是如何进入内核的?
- KERNEL_VERSION, 为多个内核版本编写模块
- 键盘, Intel 架构上的键盘
- 键盘 LED
- 闪烁, 闪烁键盘 LED
- kmod, 模块是如何进入内核的?
M
- 主设备号, 主设备号和次设备号
- 动态分配, 注册设备
- 内存段, 读取和写入 /proc 文件
- 微内核, 代码空间
- 次设备号, 主设备号和次设备号
- mknod, 主设备号和次设备号
- 调制解调器, 与设备文件对话(写入和 IOCTL)
- MODULE_AUTHOR(), Hello World (第 4 部分):许可和模块文档
- module_cleanup, 调度任务
- MODULE_DESCRIPTION(), Hello World (第 4 部分):许可和模块文档
- module_exit, Hello World (第 2 部分)
- module_init, Hello World (第 2 部分)
- module_interruptible_sleep_on, 阻塞进程
- MODULE_LICENSE(), Hello World (第 4 部分):许可和模块文档
- module_permissions, 使用标准文件系统管理 /proc 文件
- module_sleep_on, 阻塞进程
- MODULE_SUPPORTED_DEVICE(), Hello World (第 4 部分):许可和模块文档
- module_wake_up, 阻塞进程
- MOD_DEC_USE_COUNT, 注销设备
- MOD_INC_USE_COUNT, 注销设备
- MOD_IN_USE, 注销设备
- 单内核, 代码空间
- 多处理, 对称多处理
- 多任务, 阻塞进程
- 多任务处理, 阻塞进程
P
- 权限, 使用标准文件系统管理 /proc 文件
- 指针
- 当前指针, 使用标准文件系统管理 /proc 文件
- printk
- 替换, 替换 printk
- printk(), 介绍 printk()
- proc 文件
- kallsyms, 常见陷阱
- 进程
- 处理
- 多处理, 对称多处理
- proc_register, /proc 文件系统
- proc_register_dynamic, /proc 文件系统
- 使进程休眠, 阻塞进程
- put_user, 读取和写入 /proc 文件
S
- SA_INTERRUPT, 中断处理程序
- SA_SHIRQ, 中断处理程序
- 调度器, 阻塞进程
- 调度任务, 调度任务
- 段
- 内存段, 读取和写入 /proc 文件
- seq_file, 使用 seq_file 管理 /proc 文件
- 串口, 与设备文件对话(写入和 IOCTL)
- shutdown, 系统调用
- SIGINT, 阻塞进程
- 信号, 阻塞进程
- 休眠
- 使进程进入休眠, 阻塞进程
- sleep_on, 阻塞进程
- SMP, 对称多处理
- 源文件
- chardev.c, 与设备文件对话(写入和 IOCTL)
- chardev.h, 与设备文件对话(写入和 IOCTL)
- hello-1.c, Hello, World (第 1 部分):最简单的模块
- hello-2.c, Hello World (第 2 部分)
- hello-3.c, Hello World (第 3 部分):__init 和 __exit 宏
- hello-4.c, Hello World (第 4 部分):许可和模块文档
- hello-5.c, 向模块传递命令行参数
- intrpt.c, Intel 架构上的键盘
- ioctl.c, 与设备文件对话(写入和 IOCTL)
- print_string.c, 替换 printk
- sched.c, 调度任务
- sleep.c, 阻塞进程
- start.c, 跨越多个文件的模块
- stop.c, 跨越多个文件的模块
- syscall.c, 系统调用
- 源文件
- 多个, 跨越多个文件的模块, 为预编译内核构建模块
- 标准库, 常见陷阱
- strace, 模块可用的函数, 系统调用
- 结构体
- tty, 替换 printk
- struct file_operations, 使用标准文件系统管理 /proc 文件
- struct inode_operations, 使用标准文件系统管理 /proc 文件
- 符号表, 命名空间
- 对称多处理, 对称多处理
- sync, 系统调用
- 系统调用, 模块可用的函数, 系统调用
- open, 系统调用
- 系统调用, 系统调用
- sys_call_table, 系统调用
- sys_open, 系统调用